
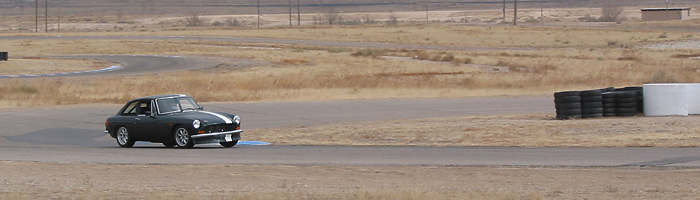
Curtis Jacobson's 1971 MGB GT with Buick 215 V8
Owner: Curtis Jacobson
Forum UserName: Moderator
City: Portland, Oregon
Model: 1971 MGB GT
Conversion by: owner
Bonnie's Story
This 1971 MGB GT was worn out, wrecked, and left derelict by the mid 1980s. My buddy Donnie Moyer
discovered it on an old farm, tucked behind Dulles airport in Northern Virginia. Donnie and I had
been talking about building a racecar. We were college freshmen: clueless and poor. But this
little MGB GT could be had for one dollar if we could convince its owner that we'd give it a good
home. (We also had to fix his wife's Oldsmobile; that only took a moment.) He had turned down
offers from people who wanted his MG for parts. We promised we'd put it back on the road.
That's what he wanted to hear.
We went to work with baling wire and duct tape, second hand tires, discarded road signs, alligator
clips and chewing gum. We managed to get the original MGB engine to run; we even put one or two
thousand miles on the old girl. She burned a whole lot of oil! At about that time, we christened our
cute little MGB GT "Bonnie". Why that name? Suffice it to say that she's always had a distinctive
"bonnet" - that's British for "hood" - and incidentally she's now wearing her fourth one. Anyhow,
just when we thought we had her carburetors sorted out, Bonnie threw a connecting rod. We had
to park her while we finished college, but we continued to think she might make a good racecar
someday. Largely ignorant of SCCA class restrictions, our daydreams included American V8 engines.
We learned that Buick's "215" aluminum V8 is the most important production engine in the history
of motorsport. It's the only American V8 to ever win a proper Grand Prix. These little aluminum
V8s powered Jack Brabham to victory in the 1966 Formula One World Championship! Buick's 215 is also
the production engine that ended the Offenhauser engine company's long monopoly at the Indy 500.
In 1962 Dan Gurney drove a Buick 215 in his "Rookie of the Year" appearance, paving the brickyard
for Ford production V8 entries in 1963. (From 1964 onward the Ford V8's that powered successful
Lotus racecars were designed exclusively for racing.) Countless other cool racecars have used the
215, or later Rover variants.
A stock Buick 215 delivers twice the power and torque of an MGB 4-banger, yet weighs fully forty
pounds less. And it's a V8!
Very shortly after the connecting rod flew, I found a running 1963 Buick Special for $150 in a
"Penny Trader" newspaper. A heart to transplant! I bought it, but it had to wait 'til after graduation.
After college, I settled in North Carolina and Bonnie moved into the parking lot of my apartment building.
I built up the Buick engine in my living room. In another Penny Trader I found a complete set of Buick
manual transmission parts. Amazingly, I got them for $150 too. With help from two Volvo Truck colleagues,
Ashley Dudding and Rob Henson, I installed the engine in 1990. Hardest part was home-made sand-bent,
tri-Y headers. In 1991, Bonnie was complete enough to pass North Carolina's required safety inspection.
She was still pretty rough looking, but she was drivable.
Since then, we've road-tripped through 46 of the United States, and into Canada. We've enjoyed
occasional track days and autocrosses too. Mostly during winters, I've made countless modifications and
upgrades. Willing to try innovative design and fabrication approaches. Always on a shoestring budget.
Favoring junkyard parts over aftermarket. Avoiding trends, trademarks, and excess. Letting Bonnie
evolve into the fierce little racecar she's always wanted to be.
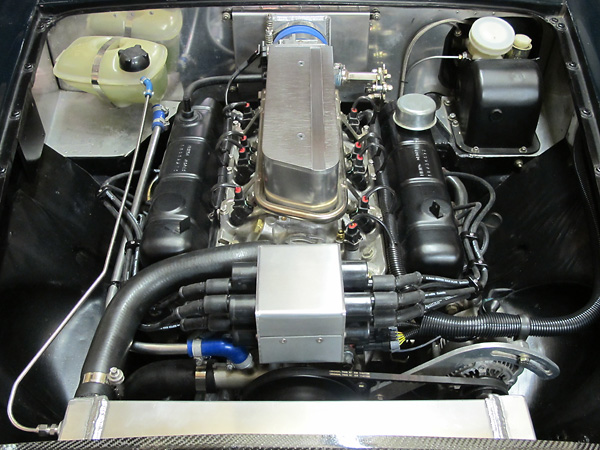
The 1963 Buick 215 aluminum V8 has been updated with custom sequential electronic
fuel injection and a custom crank-fired eight-coil ignition system.
How It Was Done
| Engine: |
stock Buick 215 engine block, crankshaft, connecting rods, valve gear, valve covers, oil pan,
timing gears, etc.
Silvolite 8.8:1, 0.030" oversize pistons.
Kenne-Bell camshaft (model 1XA, 0.462" lift, 260 degree duration, 110 degree lobe center).
Buick V6 timing cover.
Buick V6 "metric" oil pump.
AC Delco PF47 oil filter.
MegaSquirt MS3-Pro engine control module.
Rover 14CUX intake manifold and fuel rail.
Lucas fuel injectors and fuel pressure regulator.
Chevrolet throttle body and MAP sensor.
Walbro GSS250 (190 liter per hour) fuel pump with Honda Civic (45-degree angled) prefilter.
Chevrolet "LS2-truck" ignition coils.
Champion "Truck" spark plugs (part# 4404).
Custom motor mounts, utilizing Barry Controls 22000 series isolators.
Custom cowl induction intake with Ford Probe oiled gauze panel air filter.
ISO7840 fuel filler hose.
Original Buick cylinder heads were replaced in May 2009 with Rover 4.0L heads (circa 1996-2003). These late model heads have smaller combustion chambers (~28cc vs. ~37cc). Shaved 0.010" and with composite head gaskets, they raised the engine's static compression ratio to ~10.1:1. The Rover 4.0L heads also have larger valves (1.570" inlet vs. 1.5", 1.350" exhaust vs. 1.312") and significantly larger ports. For compatibility with the relatively high-lift camshaft, it was necessary to reduce the height of the valve guides. Stock valvesprings were checked for coil bind, and found to be okay. All head work was performed by Abacus Racing. At installation, lifter preload was set to 0.040" by making and installing custom pedestal shims. |
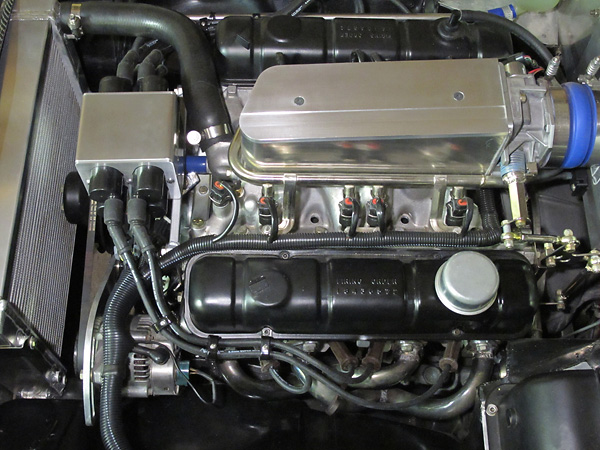 The engine was rebuilt and installed in 1991. Engine block and internal components have remained unchanged since then, while nearly everything else in this photo has been upgraded. |
|
| Cooling: | AFCO dual-pass aluminum radiator, part number "80107N", reworked with 1.5" ports and a bung for a vent line. Core size = 12" by 17.75". Dayco hoses (top: #70635, 1970-1979 Camaro and Monte Carlo. bottom: #71013, 1969-2006 Ford Mustang.) Transparent remote header tank (1990s VW Jetta, part# 171121407E) installed on firewall. Twin 8.5" Honda Civic electric A/C condenser fans, pushing. Low-clearance fan rings. Custom carbon fiber recirculation shield. Stainless steel mesh bug screen. |
| Exhaust: | custom sand bent Tri-Y headers. Dual Thrush Turbo mufflers. Evil Energy stainless steel, 2.0 inch, V-band clamps. |
| Transmission: | 1992-model Borg Warner T5 "World Class" 5-speed manual. Gear ratios: 1st=2.95, 2nd=1.94, 3rd=1.34, 4th=1.00, and 5th=0.73. Custom transmission mount, utilizing Barry Controls 22000 series isolators. Buick 215 bellhousing. D&D Fabrications steel flywheel. 10.4" Camaro clutch and diaphragm pressure plate. Externally mounted Girling slave cylinder. |
| Front Suspension: |
- Gutted Armstrong lever-type shock absorbers serve as upper control arms
and upper mounts for GAZ adjustable coilover shock absorbers.
- Eibach 6", 2.25" diameter, 525#/inch springs. SuperPro polyurethane replacement shock absorber bushings, upper and lower. - MG Limited (a.k.a. Killer Beez Racing) dropped spindles, with steering arms made specifically for my car. - Stock lower wishbone arms, lightened. Spring pans from a Moss coilover front suspension kit, lightened. Polyurethane wishbone bushings. - ADDCO 7/8" front anti-sway bar on polyurethane mounts. |
| Rear Suspension: |
- Custom 3-link of my own design.
- All three links utilize Ballistic Fabrications forged chromoly 2" rod ends with 1/2" bore balls and 3/4-16 shank threads, part#s BJ-678-11 & BJ-678-12. These rod ends have hardened 416 stainless balls supported by Nylatron GS races. (From 2025 onward, Ballistic has used polyurethane races.) The rod ends support up to 33 degrees of misalignment, and are adjustable to eliminate play. - Top link is a Speedway 1" OD swedged steel tube, part#: 91034234-13. 438mm center-to-center, installed upward 4.5 degrees from body at static ride height (loaded). Lower links are Speedway 1" OD swedged steel tube, part#: 91034234-15. 500mm center-to-center, installed level at static ride height (loaded). The lower links are parallel, mounted 865mm apart, and are 73mm below axle centerline. - Panhard rod is a Speedway 7/8" OD swedged steel tube, part# 91034258-29.5, with QA1 PCM-series 5/8-18 shank Heim joints. 800mm center-to-center, installed level at loaded static ride height (loaded) and 75mm below axle centerline. - Ridetech HQ 6.3" stroke mono-tube, gas-pressurized coilover shock absorbers with forged and anodized aluminum bodies, 1.834" pistons, 5/8" shafts, and 24-position rebound adjustment knobs mounted at the top of 2" stud mounts weigh (3.43# each. Previous shocks weighed 2.83# each. - Eibach 14", 2.5" diameter, 150#/in, coil springs weigh 3.73# each. Previous springs weighed ~22# each. Delrin coil spring washers. |
| Rear End: |
- 1984-5 Mazda RX7 GSL-SE axle. (Purchased used for $500.)
- Housing narrowed and brake/suspension brackets TIG welded on by Spriso Motorsports. (28.7# including brackets.) - Axle shafts narrowed by Dutchman Motorsports. (13.1# each, including bearings, retainers, & conversion to 1/2" lugs.) - Mazda Miata NA third member housing, lightened ~1.9# via removal of power plant frame attachment features. (46.4# fully assembled with new gears, differential, bearings, etc.) - Mazda Miata 3.636:1 ring and pinion set part number MA02-27-110, as used on Australian market 1994-2005 Miatas with automatic transmission option. (Purchased new for $575.) Ring and pinion REM finished by Performance Engineering & Manufacturing LLC. - Mazda Miata NA type-1 Torsen limited slip differential. - SKF pinion outer seal part# 12751. Mazda crush sleeve part# M035-27-171. Inner pinion bearing and spacer transferred to new pinion. SKF differential bearings part# 32008X pressed on. Timken wheel bearings, part# 511017. Timken wheel bearing seals part# 710320. Valvoline full synthetic 75W-90 gear oil. Ford threaded steel breather vent. - Mazda Miata NA propshaft flange, lightened via removal of vibration dampener. Powertrain Industries propshaft yoke part# 2602-37, $42. Dana 1310 series to 7260 series (OSR to ISR) conversion u-joint, part# 5-788X (to mate to the same propshaft I previously used with a Ford 8.8). |
| Brakes: |
- New MGB master cylinder. Wilwood 2psi residual pressure valves.
- Front: Wilwood Dynalite calipers. Wilwood 11.75" vented rotors and adapter hats. Wilwood BP-20 brake pads. Braided stainless steel reinforced brake hoses. - Rear: Mazda Miata 1994-2002 calipers (Power Stop part#'s L1377A & L1378A. 6.1 pounds each.) Volvo S40/V4 2000-2004 rotors (Volvo part# 30872940, 7.4 pounds each.) Ceramic disc brake pads (Akebono part# ACT636). Mazda CX-5 2013-2017 caliper-to-axle brake hoses (Mazda part# K01143810). Mazda brake hose retainer clips (Mazda part# W023-43-635A). Mercedes 2005-2014 axle-to-chassis brake hoses (Mercedes part# 221-420-09-4). - Stock MGB parking brake lever. Mazda Miata 1994-2002 parking brake cables. |
| Wheels/Tires: |
Panasport 8-spoke wheels (15"x6", -22mm offset, 15.0# each, polished rim).
Continental Extreme Contact tires, size 205/50R15.
McGard 64000 lug nuts (1/2"x20 by 1.5", cone seat). |
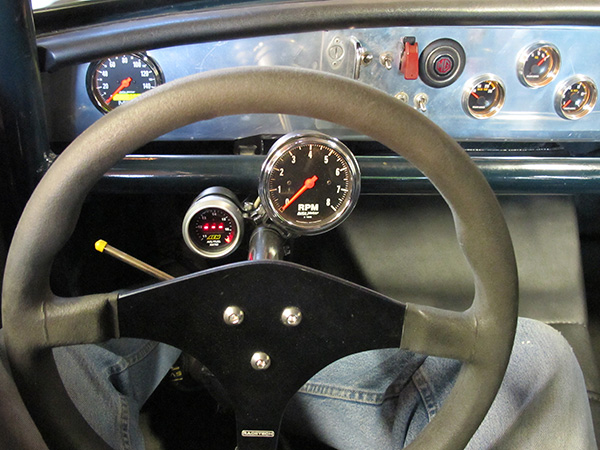 Spring 2016: Autometer Speedometer model 2489 and Tachometer model 2499. |
|
| Instruments: |
Speedometer - Autometer "Traditional Chrome" model 2489 (0-160mph).
Air/fuel ratio - AEM, electronic. Used with a Bosch UEGO wideband oxygen sensor. Tachometer - Autometer "Traditional Chrome" model 2499 (0-8000rpm). Fuel level - Stewart Warner "Track Force", electrical. Oil pressure - Stewart Warner "Track Force", mechanical. Water temp - Stewart Warner "Track Force", electrical. |
| Electrical: | Nippondenso 55A internal regulator alternator from a Chevy Swift. (Suzuki part# 31400-86210, Nippondenso part# 100211-4150.) TS Imported Automotive mini starter (8.0#). Braille B2015 AGM battery (14.0#. 1067 pulse cranking amps. 21Ah. Right side positive) installed in passenger-side footwell. Volvo Truck sealed bulkhead pass-thru. FIA-approved battery disconnect switch with removable key. (Separate contacts disconnect the alternator before the battery.) All new custom wiring featuring crosslink insulation (instead of PVC) and primarily Metri-Pac connectors. Where possible, wiring has been moved inside the cabin (instead of running under the floorboards.) Ten fuses and four relays are mounted under the dashboard: cleaner, drier, and cooler than the engine bay. |
| Lighting: | Wipac "Quadoptic" (Made in England) H4 halogen headlamps. VW Jetta front turn signals (part# 165953155), Hyundai Excel side markers. LED taillamps (see below). Toyota Corolla license plate lamps. Chevy S10 rearview mirror with integral map lights. |
| Body: | custom carbon fiber bonnet from Preform Resources. Xenon "Ureflex" air dam. PPG Deltron basecoat/clearcoat in Jaguar "Brooklands Green", with a white Sebring stripe. |
| Interior: | original MGB seats, reupholstered. Schroth Rallye Cross ASM 2" safety harnesses with bolt-in lap belts and wrapped shoulder belts. Home-made aluminum dashboard with early-model MGB padded eyebrow. Six point roll cage. (Stitched/seam-welded body seams in the engine compartment too.) Aluminum door trim. Custom quickly-removable polycarbonate rear quarter windows on lightweight steel box-tube frames held in by three quarter-turn (Dzus) fasteners per window. Built-in toolbox in cargo area. |
| Owner's Comments: |
This little car still makes me smile every time I drive her.
I've had her over 40 years and I'm comfortable with her.
She is by nature and intent a continuing project.
Since sorting out the engine swap - and especially since installing fuel injection - she's proven extremely reliable.
I've driven much more powerful and refined MGB V8 conversions, but Bonnie still feels, sounds and looks more like a racecar than any other MGB I've driven.
Being a GT, plus having a cage, my car is noticeably more rigid than others. In my opinion that's a great thing.
And she keeps improving. The most recent updates are a lightweight rear axle and custom 3-link rear suspension!
These have dramatically improved ride quality and handling.
She's now the lightest MGB I've driven by far, and I've driven more than a few.
My plan for the future is simply to enjoy her more!
|

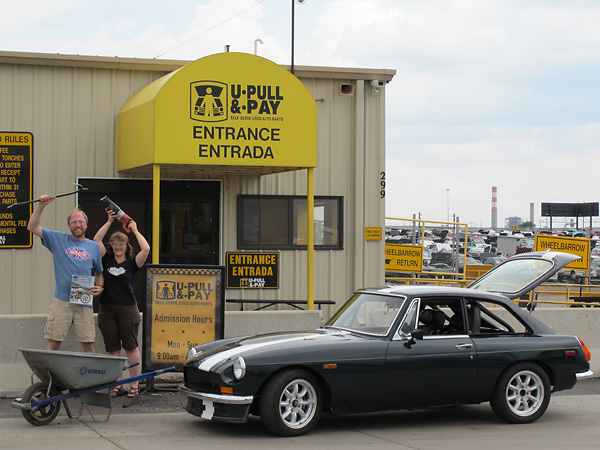
Many glamorous photos of Bonnie may be found here:
Moss Motors' 2014 Motoring Challenge!
2026 Updates: Lightweight Axle and 3-Link Rear Suspension
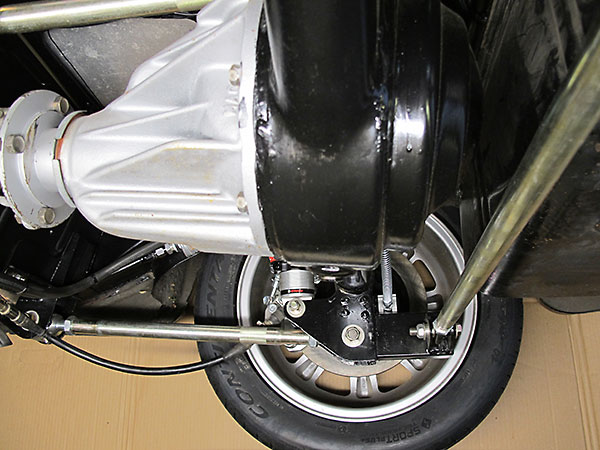
Narrowed 1985 Mazda RX7 GSL-SE rear axle assembled with 1994 Miata 3rd member, Torsen
Type-1 limited slip differential and 3.636:1 gear ratio. Weight w/o brakes = 101 pounds.
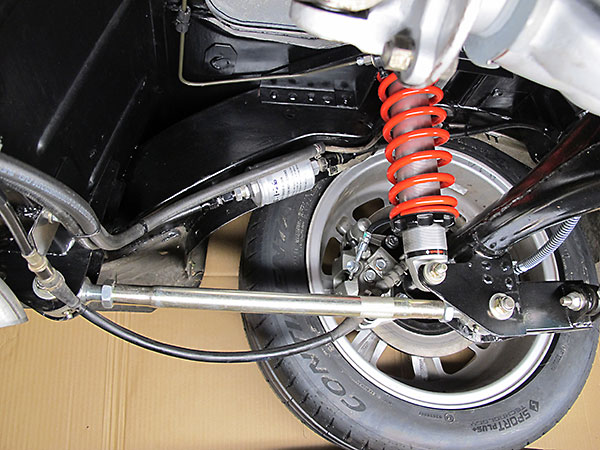
With affordable Mazda Miata iron calipers (6.1# each) and Volvo S40 brake rotors (7.4# each), the
axle weighs 128.3#. A Ford 8" with long unavailable Currie aluminum carrier and pricey Wilwood
aluminum calipers weighs about 7# more. My old Ford 8.8 with drum brakes weighed 41.3# more.
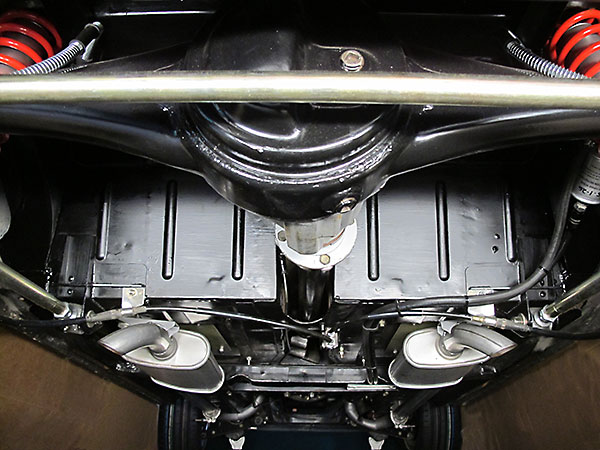
Besides being lighter, the new rear system performs much better and is far more tunable. I can
easily change ride height, spring rates, shock damping, and I have more brake pad options.
It's smoother, more balanced and precise, quicker in all situations, and it stops better too!
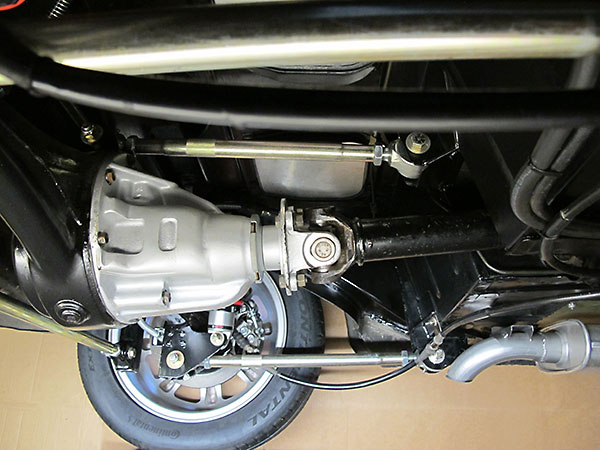
The suspension's upper link is angled upward from body to axle to achieve some anti-squat effect.
Lower links are dead-level when seats are occupied (which I simulated with stacks of barbell plates)
to prevent roll-steer. I chose to set the Panhard rod dead level although for symmetrical weight
transfer axle-end should theoretically be slightly lower than body-end.
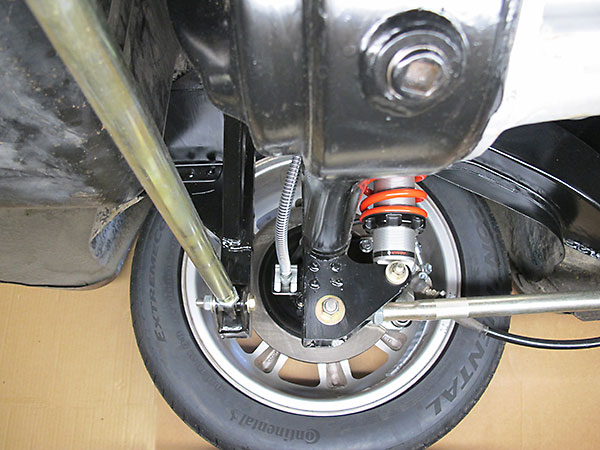
Lower links and Panhard rod are approximately 75mm below axle centerline. I put the Panhard rod as
low as feasible because its placement defines rear suspension roll center. On a sportscar, lower feels
better, especially when changing direction because roll center shifts around side-to-side and up/down
while cornering. In his book Chassis Engineering, Herb Adams wrote "A lower roll center at the
rear makes a car handle more consistently, so I recommend mounting the bar as low as possible."
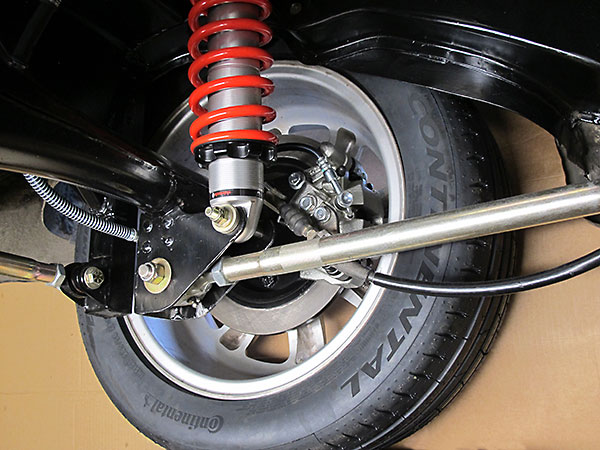
In his book Nuts, Bolts, Fasteners, and Plumbing Handbook Carroll Smith wrote "A floating bushing
installed in a double shear lug will both ensure a proper fit and minimize crash damage to the lug."
He credited fellow racecar designer Gary Anderson with this innovation. I used floating bushings for my
Panhard rod and lower shock absorber mounts because I think it's an elegant detail. See photos below.
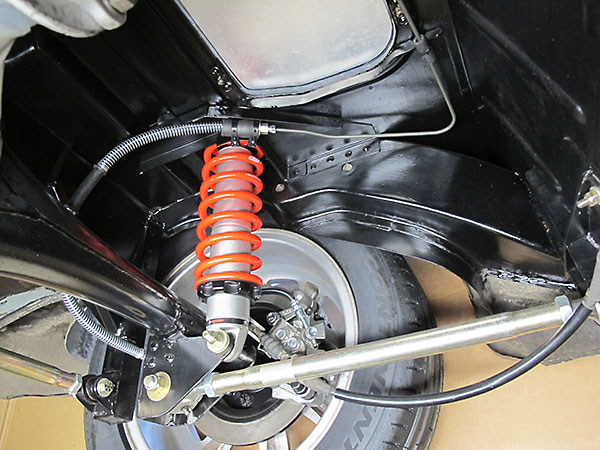
Coilovers are forward of axle to facilitate my preferred Panhard rod placement. Inboard mounting with
towers enabled relatively long shocks and springs. Long (14") springs contribute to a low natural
frequency for the suspension and thus better ride. 6.3" Ridetech HQ shocks have large pistons and
shafts plus forged aluminum bodies to provide durability and cool operation. Their mono-tube,
gas-pressurized design and their valving provide quick response and thus better handling.
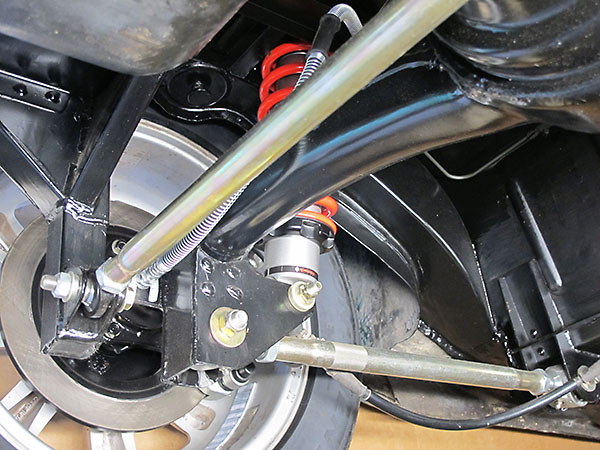
Some design and fabrication details reflect workarounds due to working on a carport, without a lift.
(Example: extensive use of plug-welds from the cabin side when installing suspension mounts.)
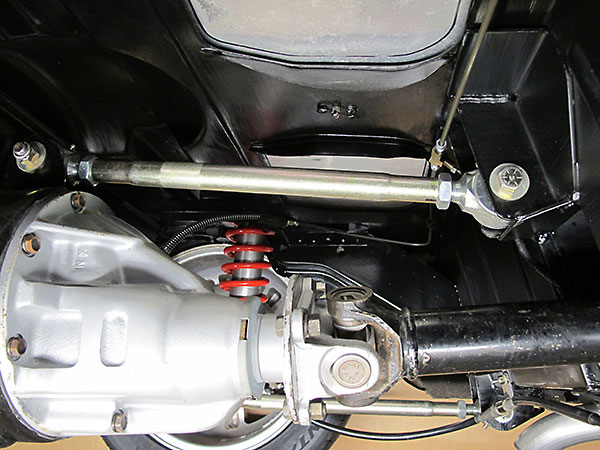
All three trailing links have Ballistic Fabrications forged chromoly 2" rod ends with 1/2" bore balls.
Their hardened 416 stainless balls are supported by adjustable Nylatron GS races. They're stupid
heavy but I trust they will provide precise location for many years whilst damping noise somewhat.
The Panhard rod however has conventional QA1 PCM-series 5/8-18 shank Heim joints at both ends.
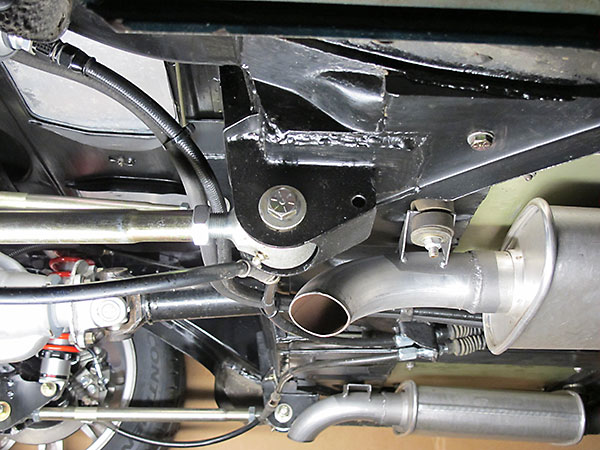
I adapted the propshaft previously used for my Ford axle with a Powertrain Industries yoke and a Spicer
1310-series conversion u-joint. With car loaded: crankshaft angles down 3.0 degrees, propshaft 4.1, and
pinion 4.9. So, the first operating angle is 1.1 and the second is 0.8. Spicer says operating angles
should be at least 1/2 degree but less than 3 degrees, and within 1 degree of each other. Nice.
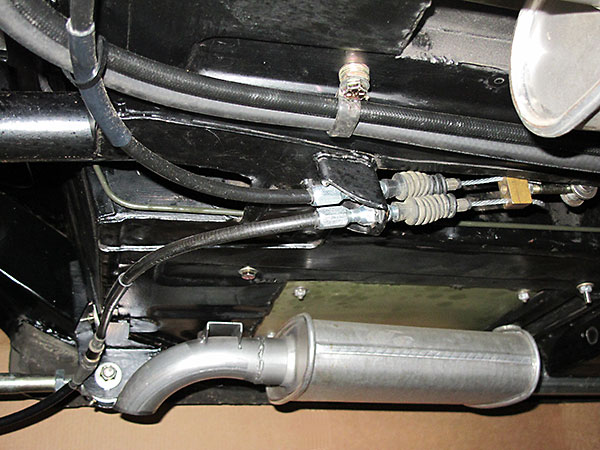
Mazda Miata parking brake cables have nice weather seals and an internal spring mechanism to help
retract pads after lever release. Tips: stainless steel control cables are best cut to length with
a cutoff wheel. Then, always dip their ends in silver solder to prevent fraying.
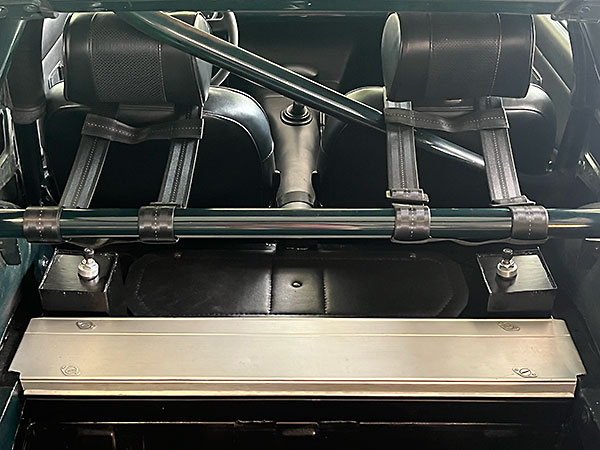
Shock absorber 24-position rebound adjustment knobs are conveniently accessible, inside the cabin.
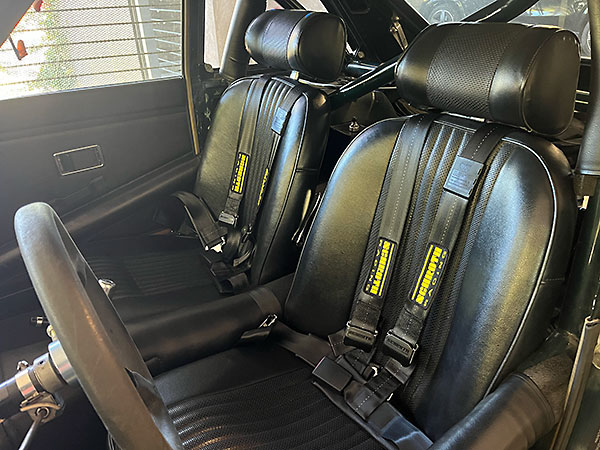
Schroth "Rallye Cross" ASM 2-inch safety harnesses with bolt-in lap belts and wrapped shoulder belts.
ASM stands for Anti Sub-Marining, a feature that prevents sliding under the lap belt during a crash.
Not just safer than my previous vintage Simpson 3-inch latch-and-link belts, they're more comfortable
and significantly lighter too.
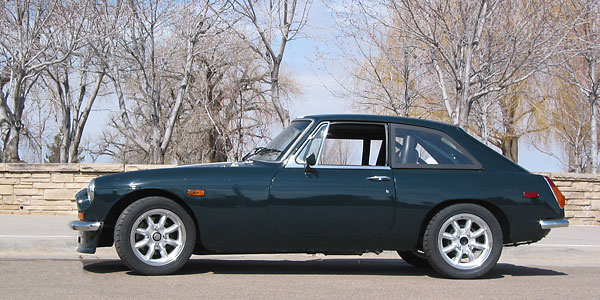
As measured on July 18, 2026 this MGB GT V8 weighs 2020 pounds "wet" (i.e. full tank of fuel).
290 pounds lighter than when she left the factory. 407 pounds lighter than a "factory" MGB GT V8.
Corner weights 502 (LF), 537 (RF), 500 (LR), 481 (RR). Distribution: 51.4% front to 48.6% rear.
Trend: at BritishV8 2013 she weighed-in at 2150 pounds, and at BritishV8 2008 she weighed 2180.
More weight reductions are planned.
2023-2025: Rear Axle and Suspension Build Photos
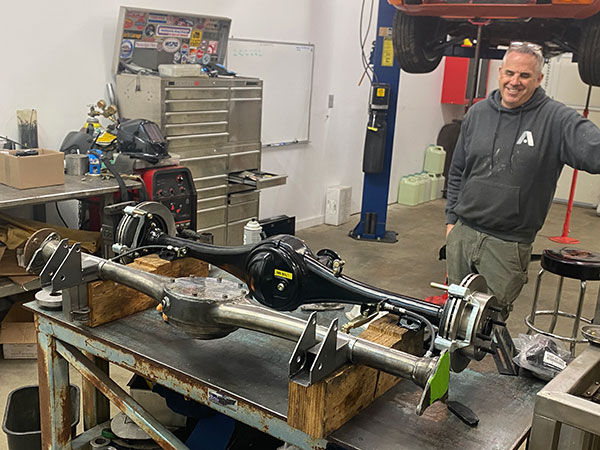
After stripping down my 1984-5 Mazda RX7 GSL-SE axle and tack-welding suspension brackets to it,
I took it to my friend Michael Spreadbury of Spriso Motorsports to be narrowed.
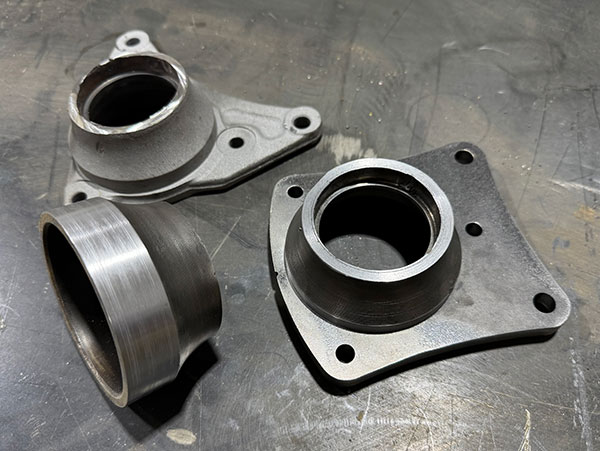
Michael has narrowed about 80 GSL-SE axles, mostly for use in Datsun sportscars. GSL-SE axles
come standard with heavy duty axle shafts (with 4x4.5" lug pattern), disc brakes with
vented rotors and integral parking brakes, limited slip differentials, mounts for a 4-link
rear suspension, a Watts linkage, and an axle-mounted anti-sway bar.
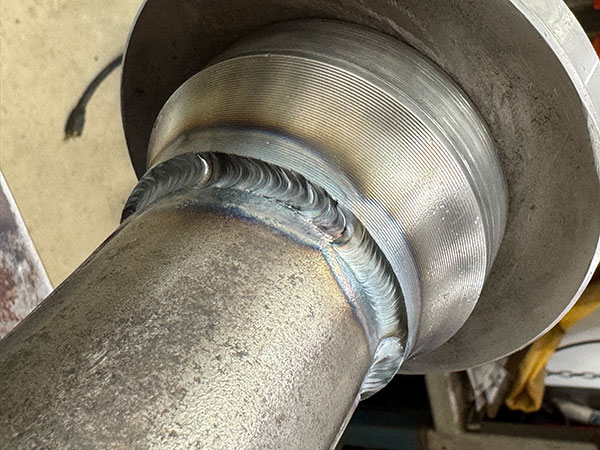
Michael has the jig, lathe, TIG welder, and experience to narrow these efficiently with confidence.
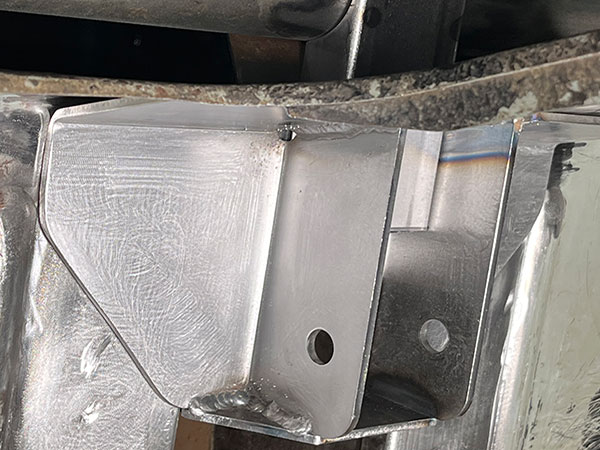
Trial installation of upper bracket, ready to be welded to both rollcage and body sheetmetal.
My lower link brackets are 5-piece assemblies below the floor, plus doubling plates above.
Why didn't I just use original MG leafspring mounts, plus braces forward underneath the seats?
Too much of that space was claimed by my exhaust system years ago.
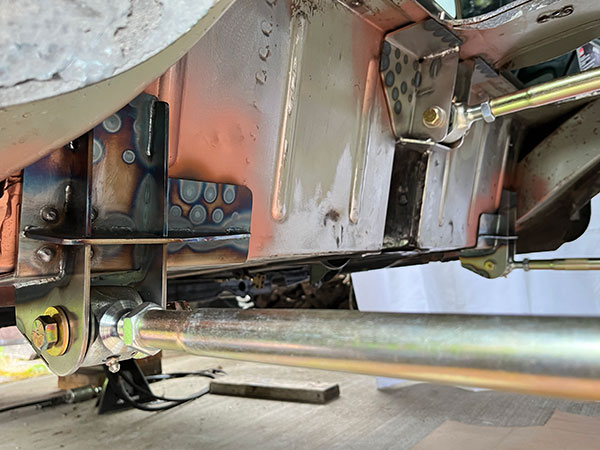
For all three trailing link brackets, I used plug-welds from inside the cabin plus stitch welds from below.
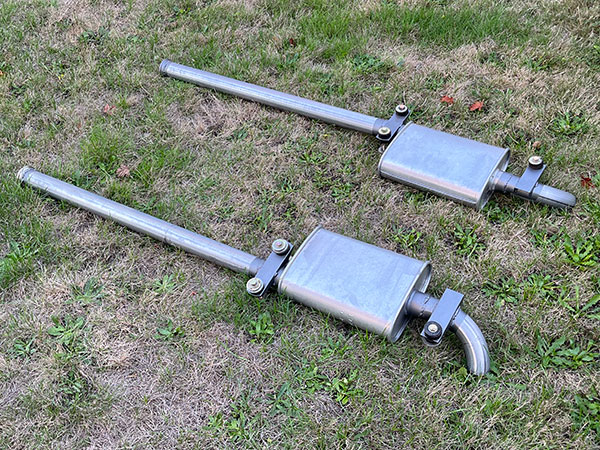
My car's mufflers have been tucked up under the seats since about 1990, and I like them there.
I did however take a weekend to freshen up the system, adding V-band clamps for easier service
Thrush Turbos remain my favorite mufflers, by the way.
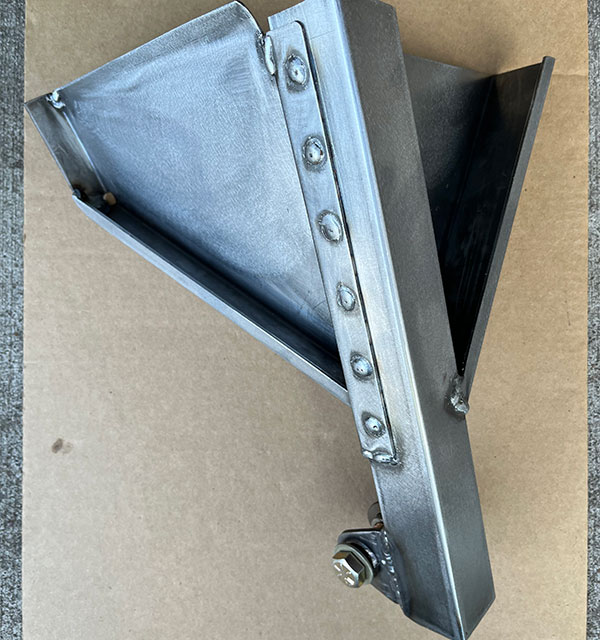
Panhard rod bracket, preassembled and ready for attachment to the MGB's body.
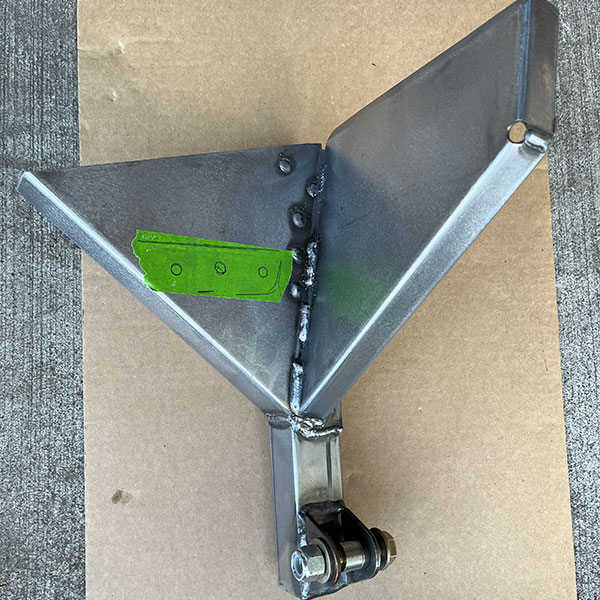
This view of the Panhard rod bracket from the opposite side shows its tab-and-slot
fabrication details. Note also how it mates to the Heim joint with a floating bushing,
enabling the bolt to be torqued to spec without pinching the bracket ears together.
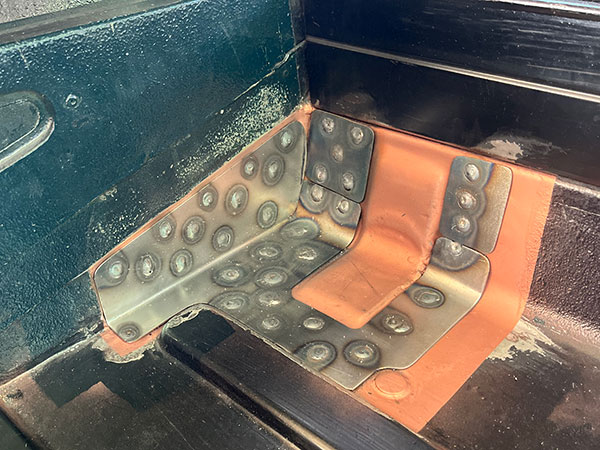
Where the faces of steel parts are welded together, I used weld-thru primer. However,
I removed the primer where I knew I'd be striking arcs to prevent weld splatter. I don't
think it's a great primer for paint, so I removed overspray after completing welds.
(Not shown: another doubling/reinforcing panel underneath the floor.)
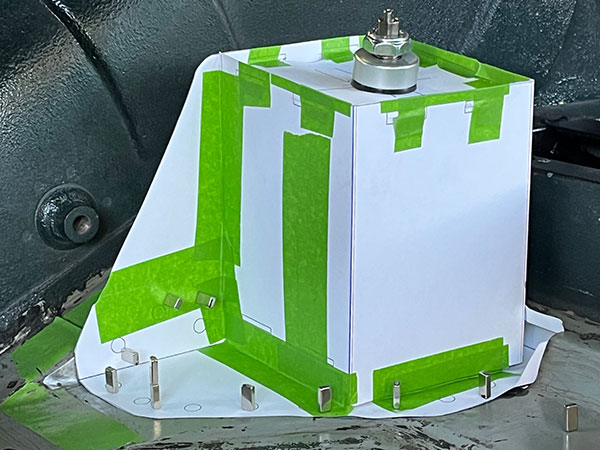
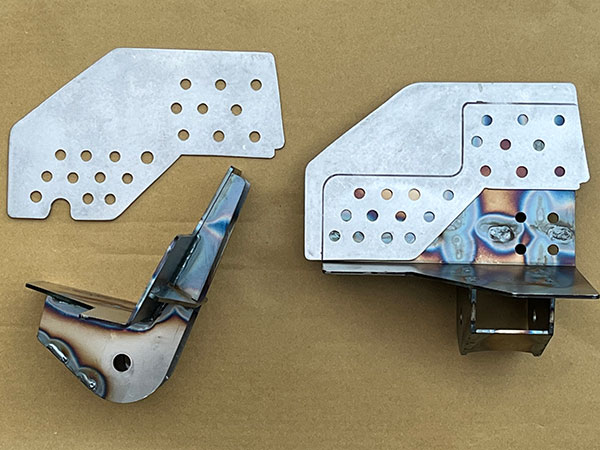
This is a cardstock model of the bracket I designed for mounting coilover absorbers. I used
this model to determine what offset for the stud mount would maximize clearance around
the springs. After finalizing the design, I uploaded 2D CAD files to Send-Cut-Send's website.
They laser-cut and bent my steel parts, and delivered within 2 weeks.
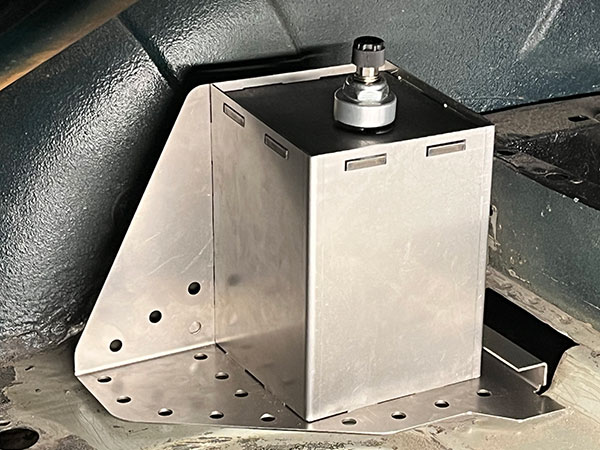
With each successive fabrication, I took more effective advantage of tab and slot features for
component part self-alignment. Metals stretch when folded, so I had to learn how to calculate
bend allowance. (This photo was taken minutes after my package from Send-Cut-Send arrived.
Later, I lengthened one slot with a file to eliminate the gap you see at bottom-left corner.)
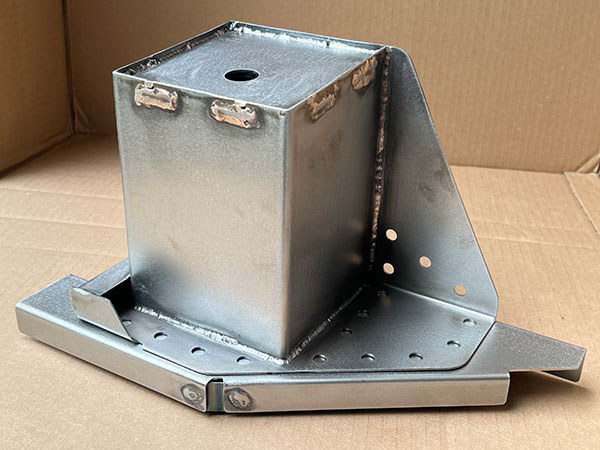
The coilover brackets required TIG-welding instead of MIG-welding to prevent
distortion, so I called on Michael Spreadbury (Spriso Motorsports) again. To ensure
the parts are vapor proof, we followed-up with braze around the top-plate slots.
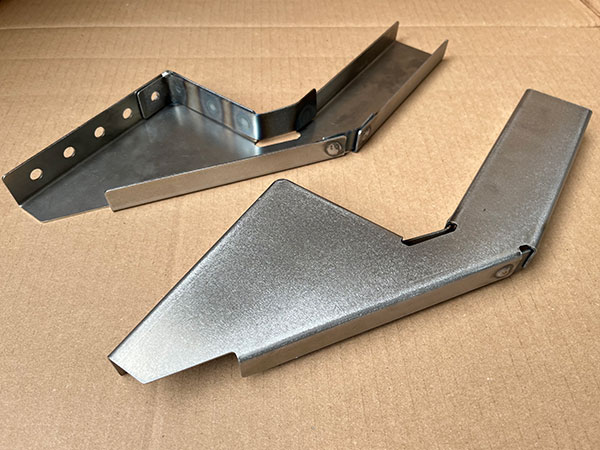
I conceived these "foundations" as a way to spread out the force my coilovers exert on the body.
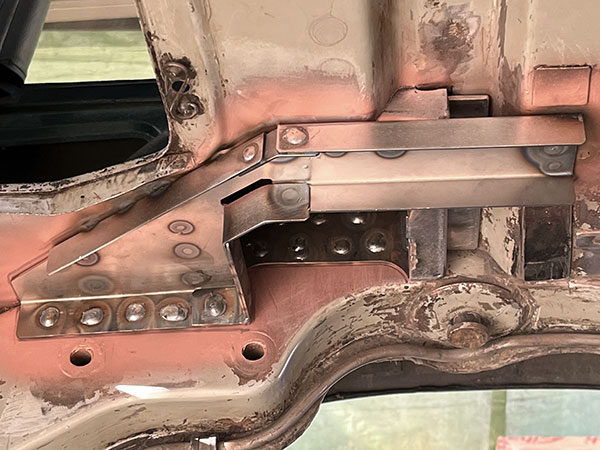
Coilover shock absorber mounting brackets, viewed from below.
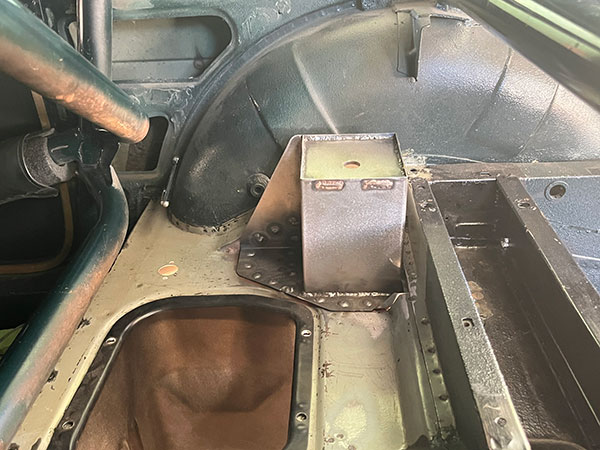
Coilover shock absorber mounting brackets, viewed from above. All the plug-welding was
complete, but there was still some welding to do around the edges of the parts.
(Foreground: Clark & Clark Specialty Products battery compartment / storage bin.)
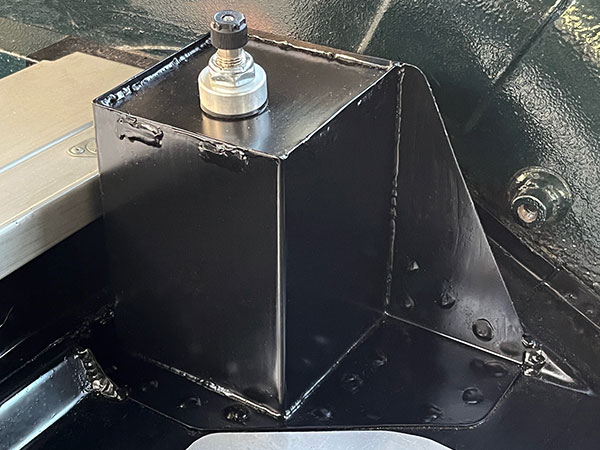
Final welds and paint. In lieu of traditional rubber mounts, these stud-mount coilovers
utilize 2-piece nylon balls. They swivel in aluminum sockets, sandwiching a 3/16" plate.
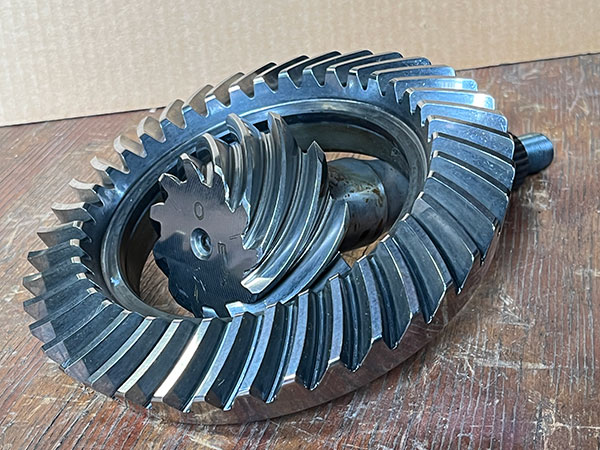
I purchased a brand-new Mazda 3.636:1 ring and pinion set (part# MA02-27-110).
Made for Australian market auto-transmission Miatas, Mazda didn't offer this ratio in USA.
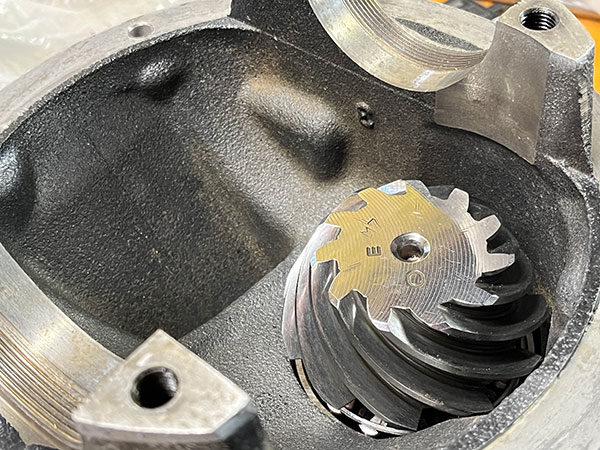
Ring and pinion were sent to Performance Engineering & Manufacturing for REM finishing.
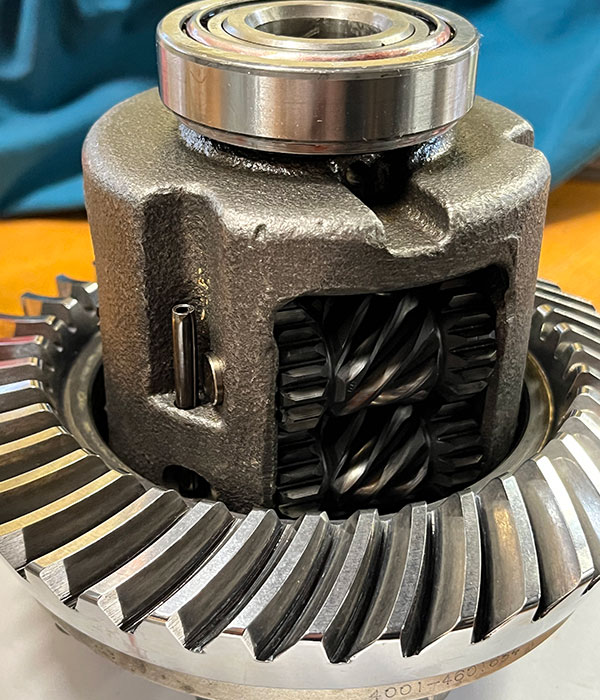
Mazda Miata NA Type-1 Torsen limited slip differentials perform better than clutch-type
limited slip differentials, including even the one my RX-7 GSL-SE axle came with.
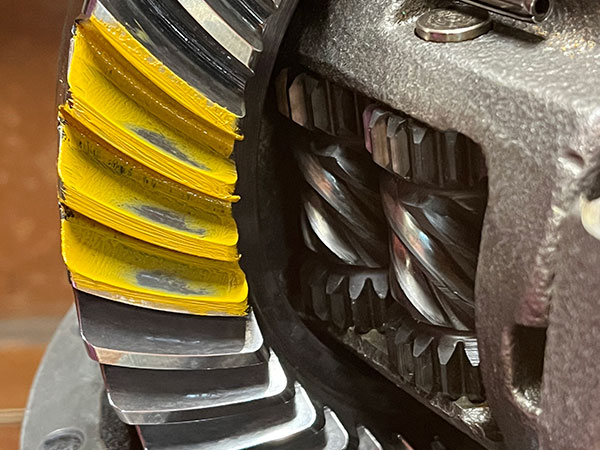
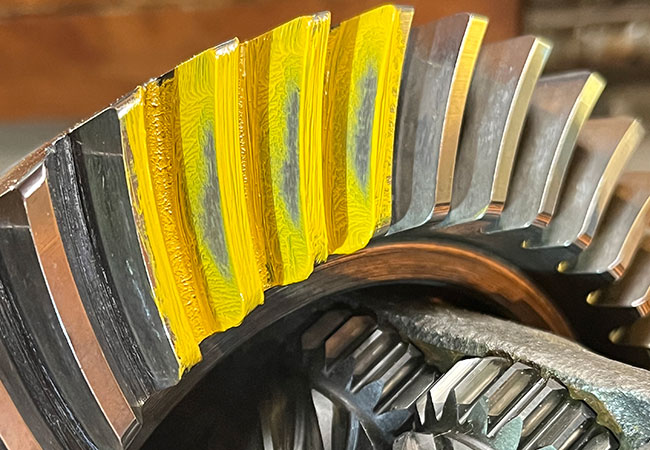
I followed Jesse Prather's instructions to the letter when I set-up my differential.
This photo shows proper gear engagement on the drive side. Next photo shows the coast side.
Jesse revealed a couple tricks: one of them is that you never need to mess with shims
to set-up Miata ring and pinion sets if you observe that their housing and pinion spacers
are matched pairs! (Just don't get the spacers from two different third members mixed up.)
This is the reason I chose to use the Miata carrier in lieu of the RX-7 carrier.
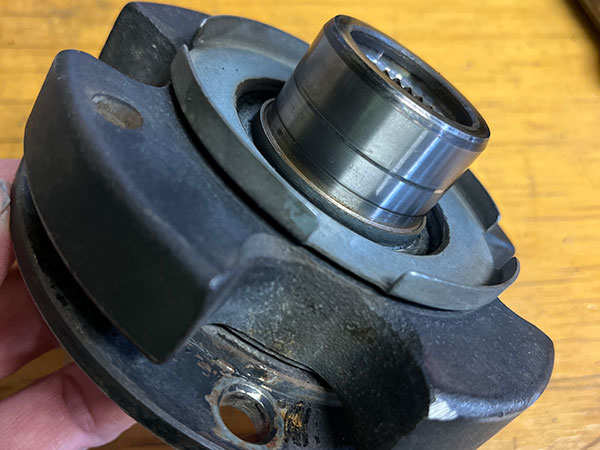
Manual transmission Miatas come with vibration dampeners installed on their prop-shaft flanges.
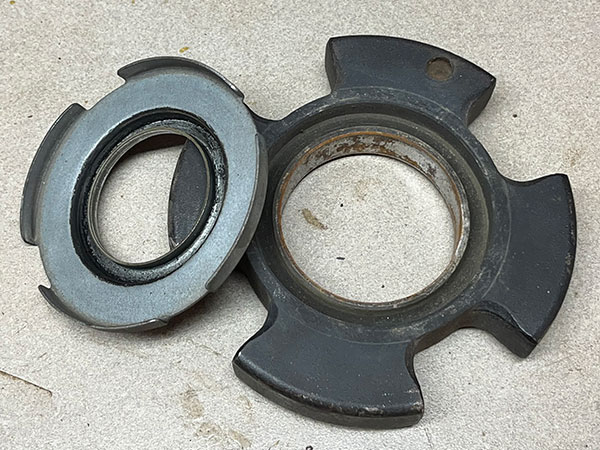
I removed and discarded the ~1.75# vibration dampener. It's unsprung, rotating dead weight,
and a potential cause of vibration if its rubber component fails.
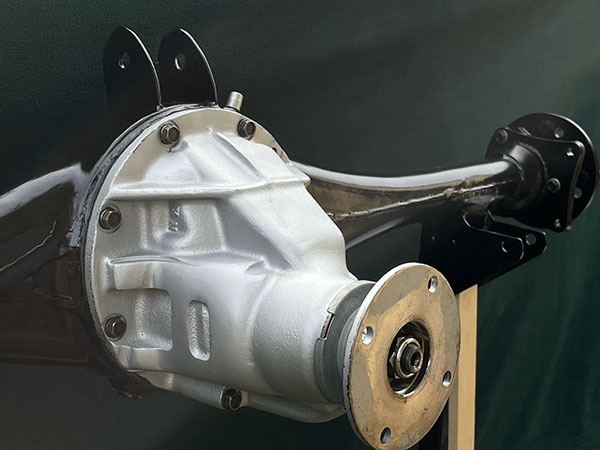
1994 Mazda Miata third member weighs 46.4#, complete with new gears, differential, bearings, etc.
(Note: I lightened the carrier ~1.9# via removal of Power Plant Frame attachment features.)
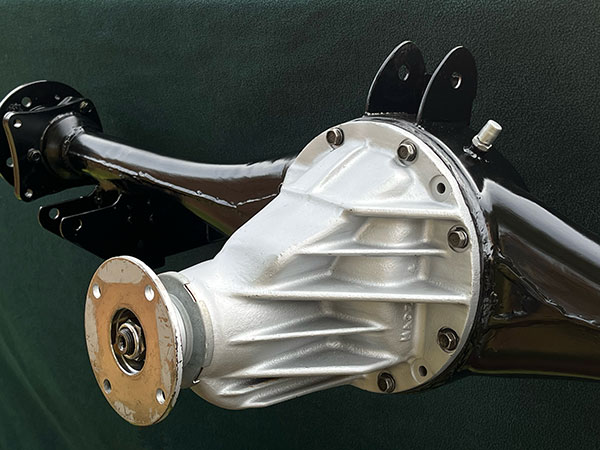
Dutchman Motorsports narrowed my axle shafts. They now weigh 13.1# each, including bearings,
retainers, & lugs.
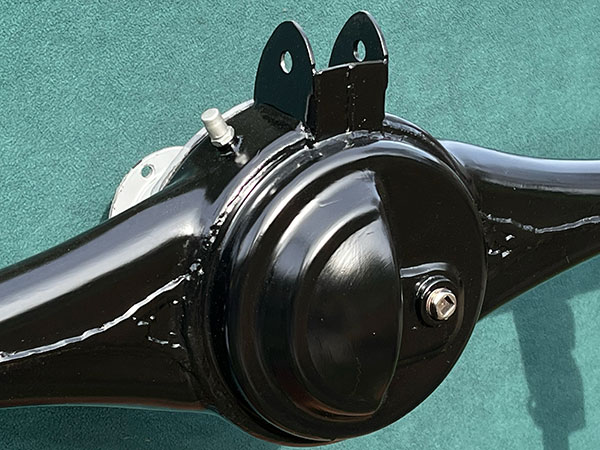
The narrowed GSL-SE axle housing weighs just 28.7#, including all my heavy-duty suspension brackets
Note also: Ford threaded steel breather vent in lieu of Mazda's plug-in plastic vent.
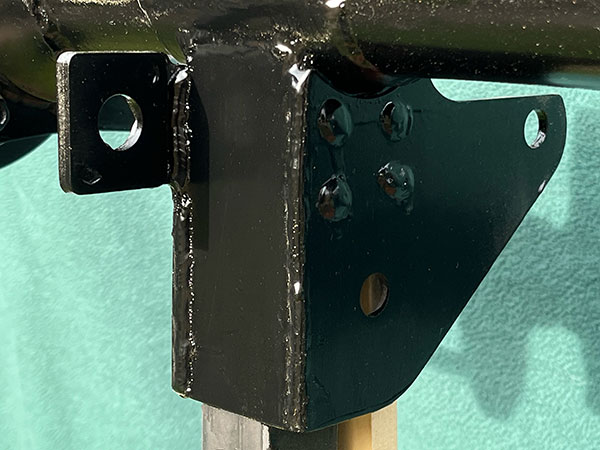
Driver side lower link / coilover bracket.
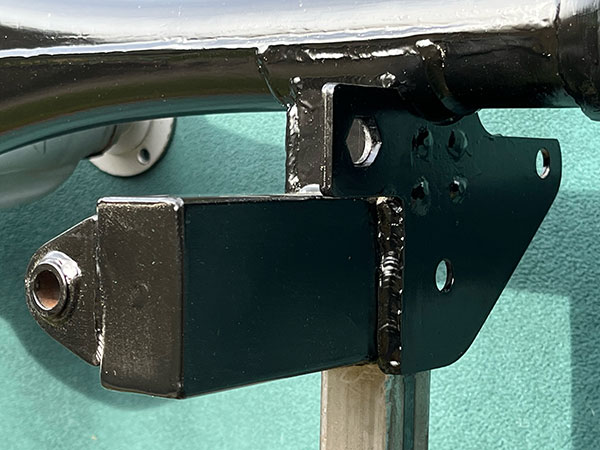
Passenger side lower link / coilover bracket also supports the Panhard bar.
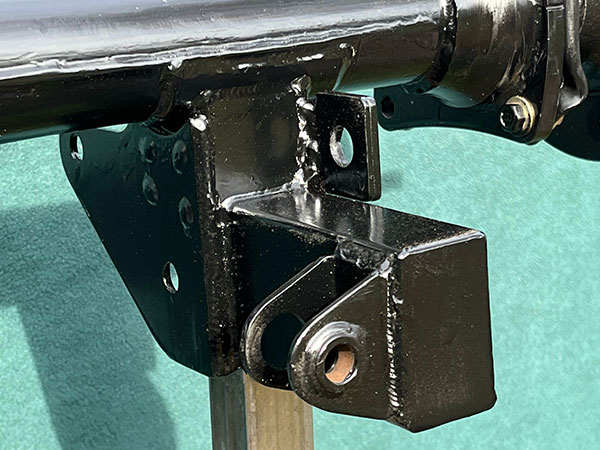
Both lower link brackets also include features for supporting brake hoses.
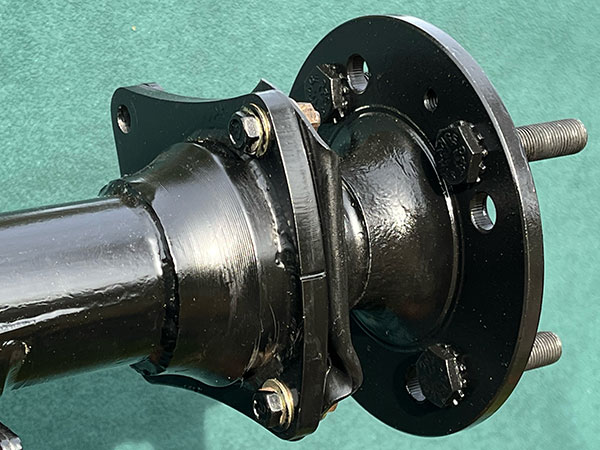
Mounting brackets designed to suit Miata calipers.
August 2023: Battery and Starter Weight Reductions
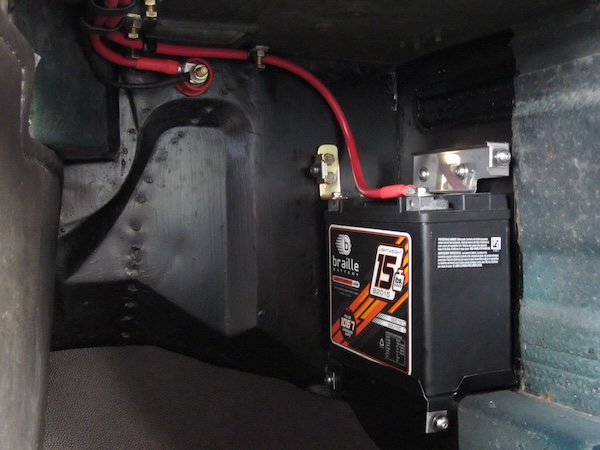
Braille B2015 AGM battery (1067 pulse cranking amps. 21Ah. Right side positive.)
This battery weighs 14.0#, whereas the lead-acid battery it replaced weighed 29.0#.
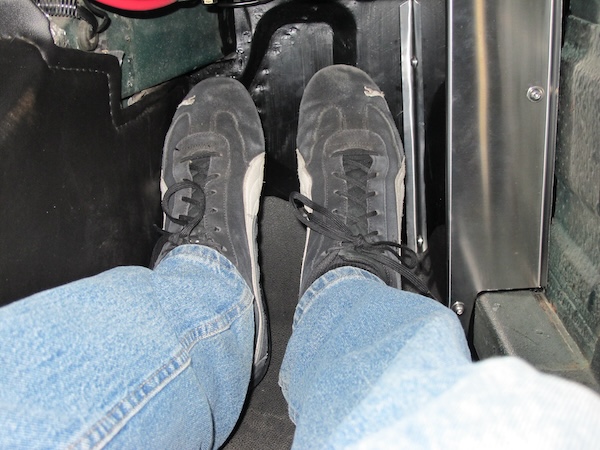
The battery is installed in the passenger-side footwell, behind a simple stainless steel cover.
The new bracketry, hold-down, and cover are 5.6# lighter than what they replaced.
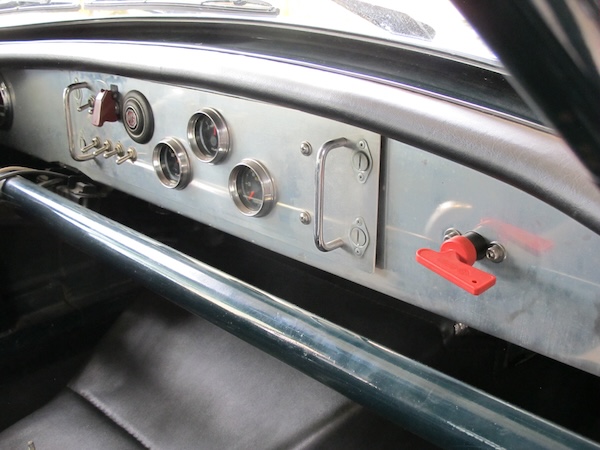
FIA-approved battery disconnect switch with removable key.
(Separate contacts disconnect the alternator before the battery.)
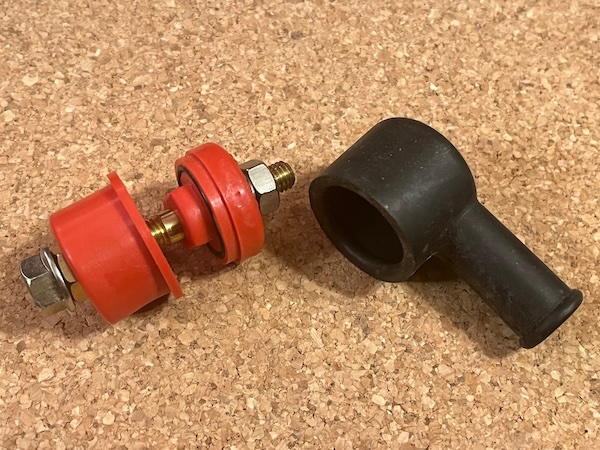
Volvo Truck sealed bulkhead pass-thru. The total weight of pass-thru and cables is 1.0#,
versus 2.2# for the previous solution.
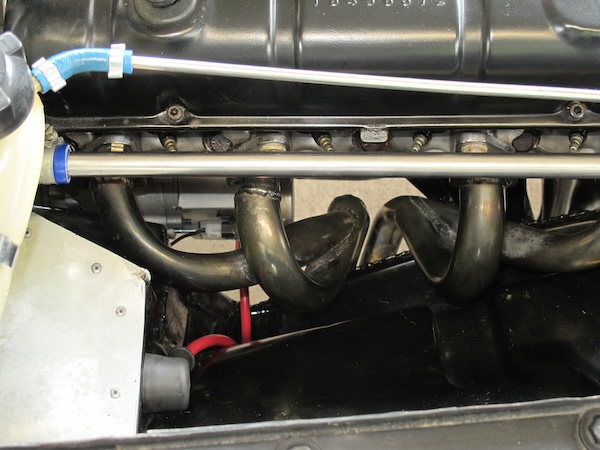
TS Imported Automotive mini starter weighs 8.0#, versus 21.8# for my old Delco-Remy starter.
Total battery and starter weight reduction: 35.8 pounds.
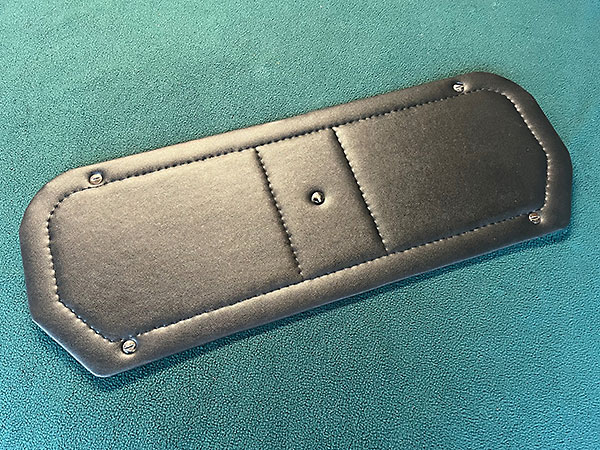
Upholstered aluminum access/storage-bin cover, made to match door trim panels (described below.)
Chrome-bumper MGBs came with a heavier, painted steel version to cover twin battery compartments.
Original cover, battery support structure, and hold-downs total up to ~16 pounds.
May 2014: Easy LED Taillamps
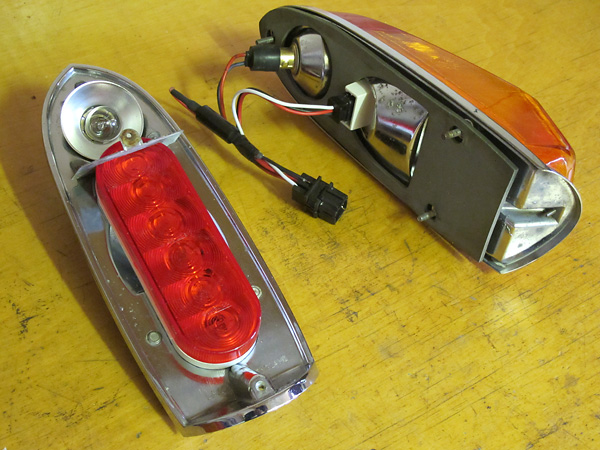
It's 2014, and almost every tractor trailer produced uses light emitting diodes for rearward lighting.
Mass production has advanced the state-of-the-art and brought costs down. So, I decided to install
some off-the-shelf, sealed, stop/turn/taillamp assemblies inside my MGB's old Lucas housings. I wired
them to illuminate in all three modes. MGB's original incandescent brake and tail lamp feature remains.
Bottom line: much more effective and also more reliable lighting. Total cost: less than $30.
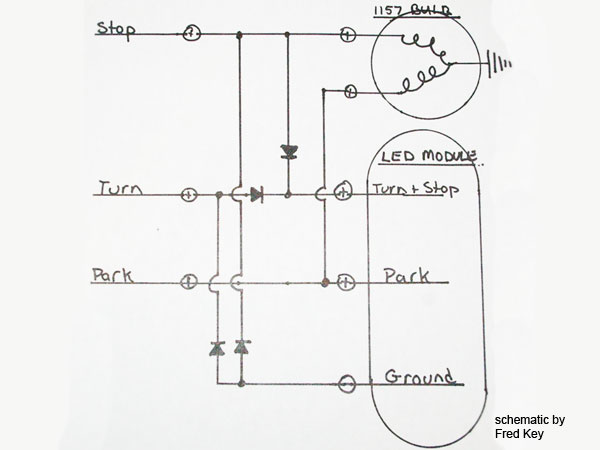
A diode is simply a checkvalve for electric current. This schematic shows how to use four diodes
to isolate the various lamp functions. One diode keeps the incandescent brake lamp from blinking
with the LED turn signals. Another diode keeps front and rear lamps from affecting each other.
My friend Fred Key suggested adding two more diodes to keep the rear turn signals blinking even
when the brake lights are applied. No relays are required, and I use an ordinary flasher module.
April 2014: Upholstered Transmission Tunnel
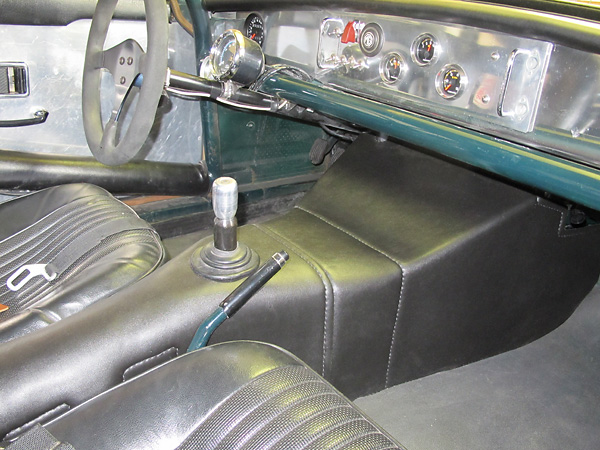
From shifter hole to firewall, the steel transmission tunnel was fabricated back in 1990. Since then,
the tunnel had only ever been covered with paint. I had a lot of time to think about covering it.
I knew I didn't want a console or carpet! Design criteria included: total weight under two pounds,
easy to keep clean, and removable without tools or fasteners. This resulting two-piece transmission
tunnel cover features hand-stitched Morbern "Allsport" 4-way stretch vinyl installed over 1/8" thick
landau pad atop a very lightweight molded fiberglass structure.
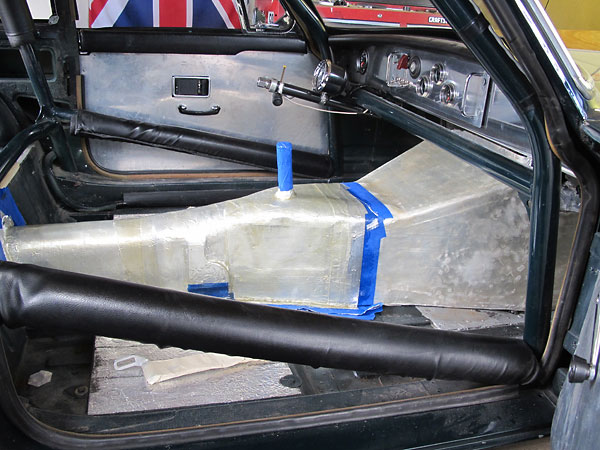
In this photo, the rearward fiberglass part was newly made. The forward part had been made the day
before. Both were constructed of two layers of glass fabric and regular polyester resin. First, I
taped 1/16" craft foam to the steel tunnel to even out its irregular shape. I covered the foam with
aluminum foil faced duct tape, and then applied mold release to the tape. (Quick. Easy. Cheap.)
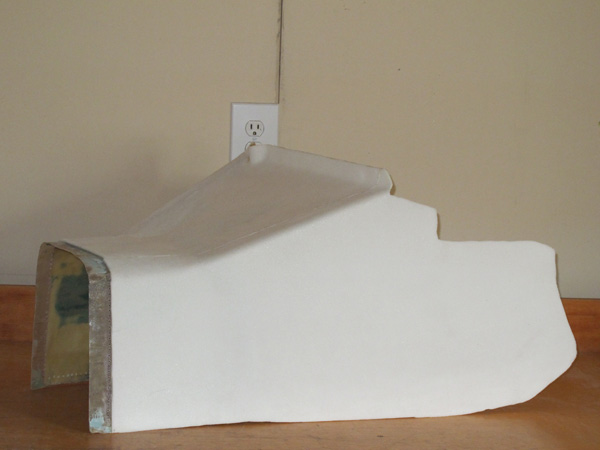
I applied a very modest amount of Evercoat "Lite Weight" body filler to the fiberglass to fill in
some of the hollows. Then I laid-out and drilled a pattern of over 1000 5/32" diameter stitch holes
on 5/16" spacing. After that, I used Weldwood HHR (high heat rated) contact cement to secure
sandable/sculpable, 1/8" thick, closed-cell cross-linked polyolefin landau pad over the fiberglass.
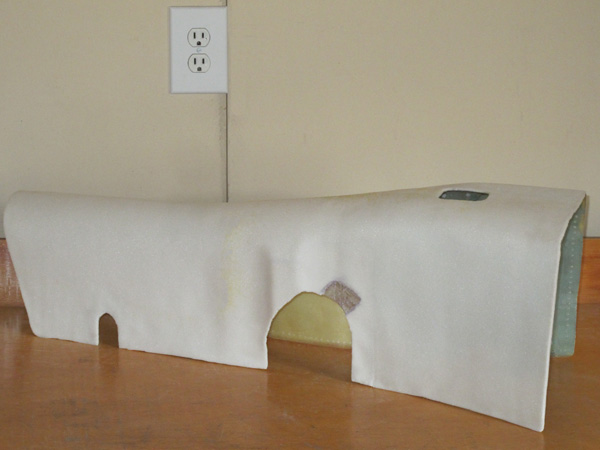
Contact cement holds the vinyl tightly in place, but a whole lot of strategically placed stitches are
there to make sure. The thread is waxed nylon from Tandy Leather, and the stitch technique is a two
needle "saddle stitch". In other words, both needles passed through every hole, one from the back
and the other from the front. Stitching goes all the way around all edges and also through the middle
of all concave areas. The two upholstered covers fit nice and tight with no fasteners, except ones
that secure a thin stainless steel protective shield next to the throttle pedal.
June 2014: Upholstered Door Panels
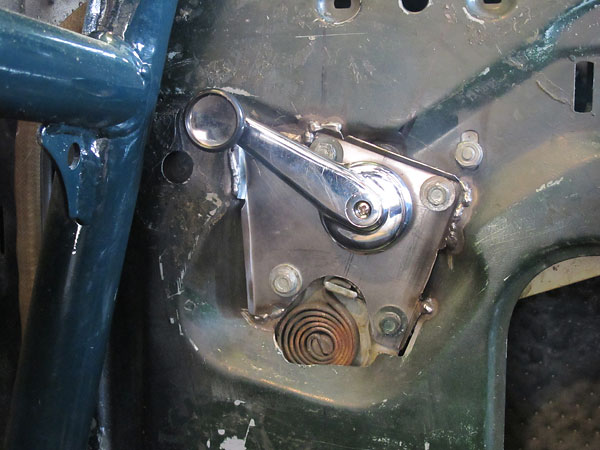
When I installed the roll cage, I got the front hoop too close to the passenger-side window crank.
Moving the cage wasn't practical, so I decided to clock the window winder bracket rearward.
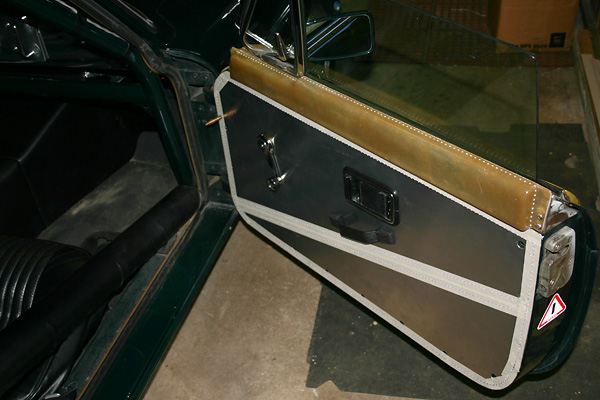
With the window crank in a non-standard location, a standard MGB door card wouldn't fit anymore.
No worries! I preferred to make my own upholstered door cards and caps anyhow. I molded the
door caps out of fiberglass. I made them taller than stock to be more comfortable as armrests.
Of course they're lighter weight than stock too. I made door cards out of flat aluminum panels.
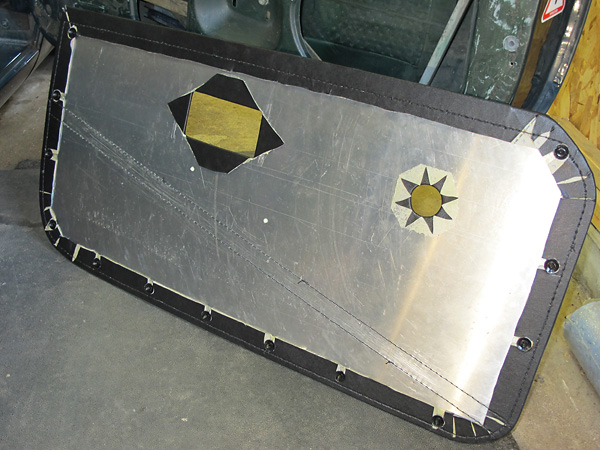
Two-needle hand stitching through pre-drilled holes. Like the transmission tunnel cover (above),
door panels and caps were covered with landau pad and then premium automotive grade vinyl.
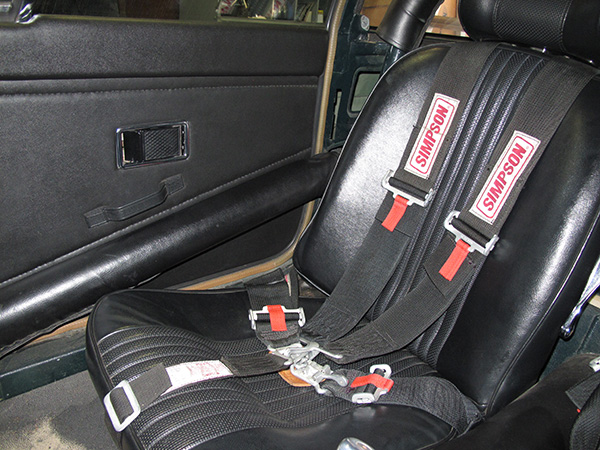
Stitching across the door panels was aligned to match rollcage tubes.
Stock 1972-only MGB door pulls were substituted for the earlier style.
Winter 2012/2013: Electronic Fuel Injection
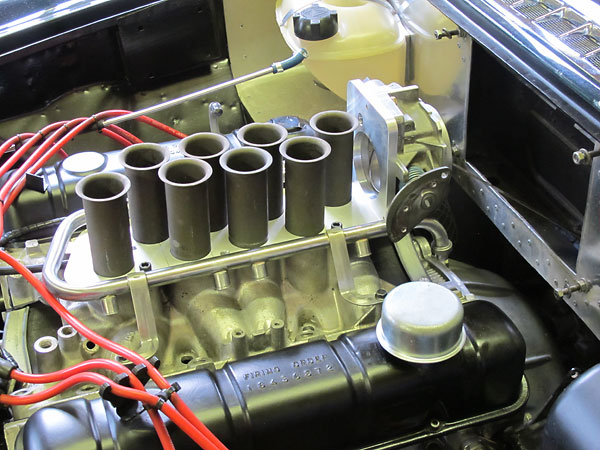
Here, a bespoke fuel injection system was coming together! The basic plan was to combine a
Rover manifold and injectors, a custom cowl-induction plenum, a GM throttle body, and a
custom built/programmed MegaSquirt (speed-density) control system.
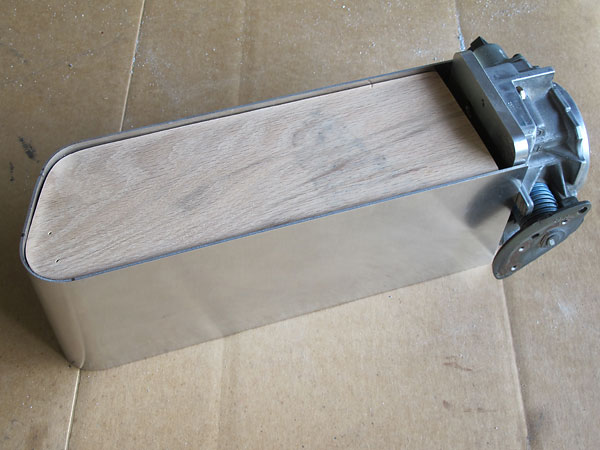
6061-T6 aluminum (16-gage) has the right properties for a wraparound plenum wall. However,
to form it with modest force you must first anneal the bend region. Draw a line on the surface
with a Sharpie, and then use a propane torch to heat the surface until the line disappears.
(I had to repeat the annealing process several times as I worked my way around each bend.)
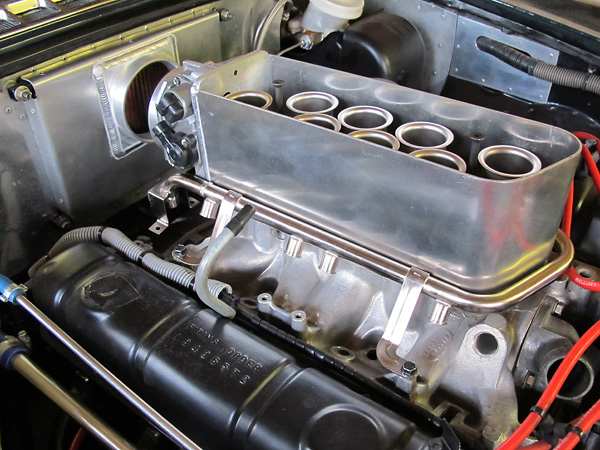
December 2012: a Rover fuel rail has been extensively modified, then electroless nickel plated.
The plenum wall has been welded up. I also fabricated a new air cleaner housing.
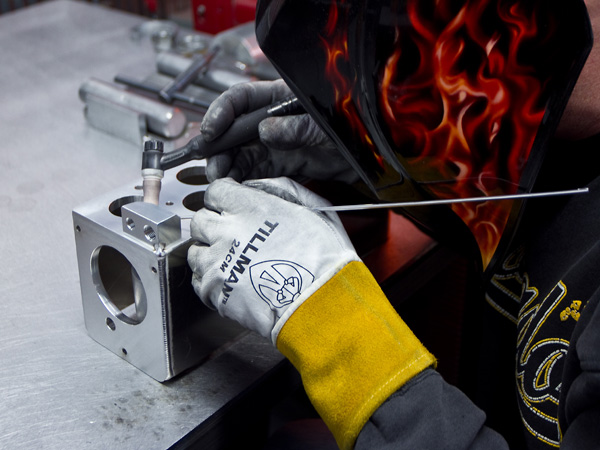
This photo shows attachment of a PCV and MAP sensor port block to the bottom of my plenum.
The guys at Peterson Fluid Systems in Denver certainly do beautiful TIG welding, don't they?
They're fun people to work with too. (Photo by Mike Morten for BritishV8.)
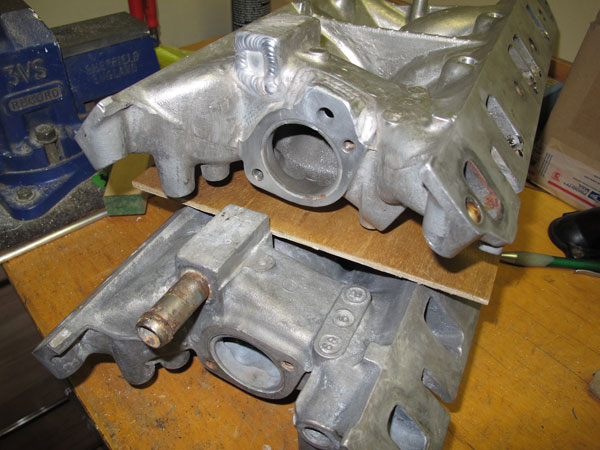
Top: Rover intake manifold thermostat bypass has been relocated to suit Buick style timing cover.
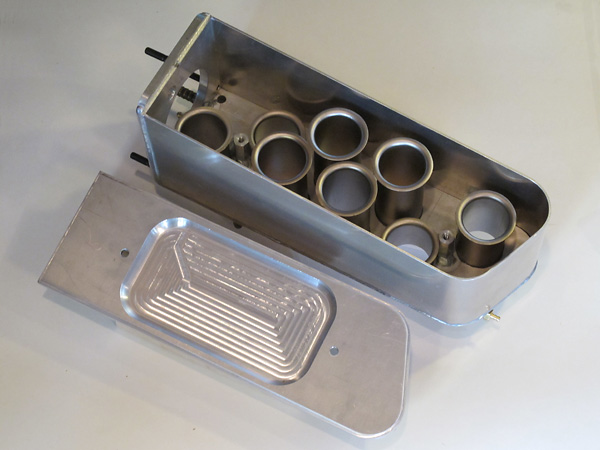
The volume of each intake tract, measured from valve seat to trumpet top, has been
carefully cc'd and equalized. Note that the trumpets for cylinders #1 and #7 were
shortened significantly compared to the trumpets for cylinders #2 and #8.
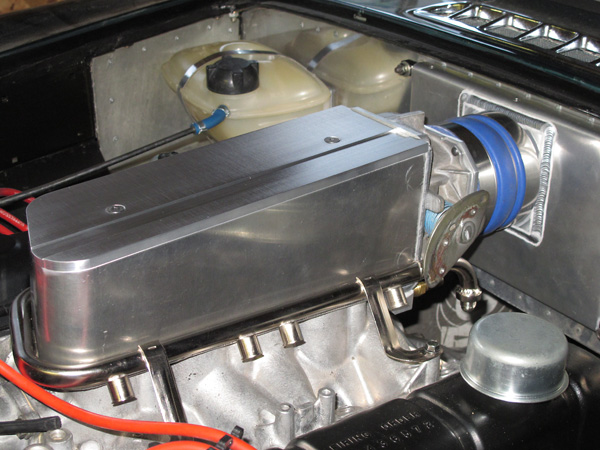
Plenum wall trimmed down (at an angle) and capped with a lid.
Note racing stripe offset to one side, to echo my car's paint scheme.
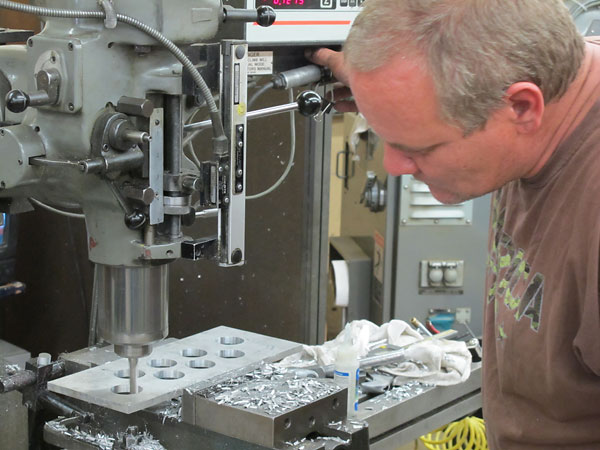
My very good friend Scott McRoberts was incredibly helpful with this project.
I heartily recommend his family business: McRoberts Machine of Longmont Colorado.
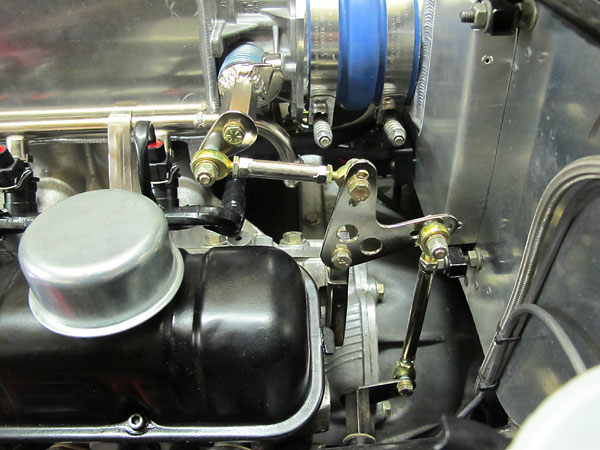
The throttle linkage is rather elaborate, but it proved to work well.
I sent it and some other parts out to be electroless nickel plated.
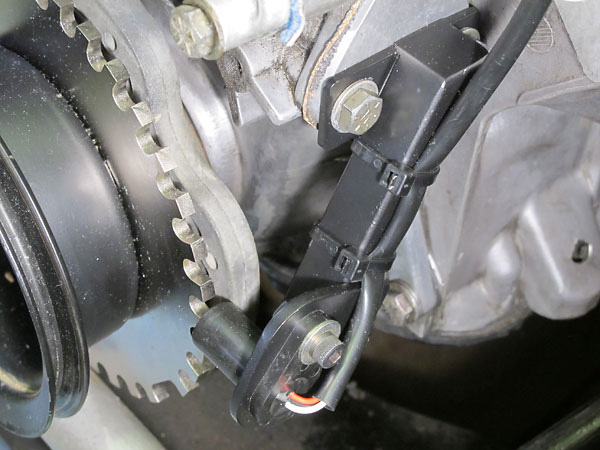
I'd planned to use a Hyundai crank sensor because they're widely available and have a nice
form factor. After mounting the Hyundai sensor on my engine, I thought to verify its signal
output. Instead of producing a 0 to 5 volt waveform, the output toggled between 5 and 8 volts.
So... this is a second generation Hall effect sensor on a second generation bracket.
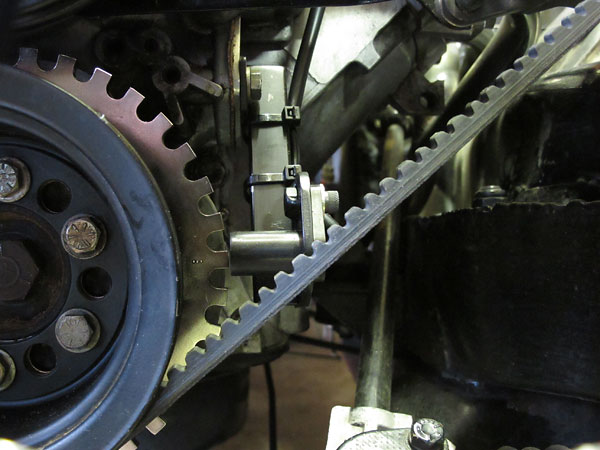
This is a "36-1" trigger wheel: it has 36 teeth positions on ten degree centers and one
missing tooth to provide a reference for indexing. I mounted the trigger wheel between
balancer and crank pulley on the six existing bolts. (Buick's six-hole pattern is unusual.
Most of the pre-drilled aftermarket trigger wheels are set up for four or eight bolts.)
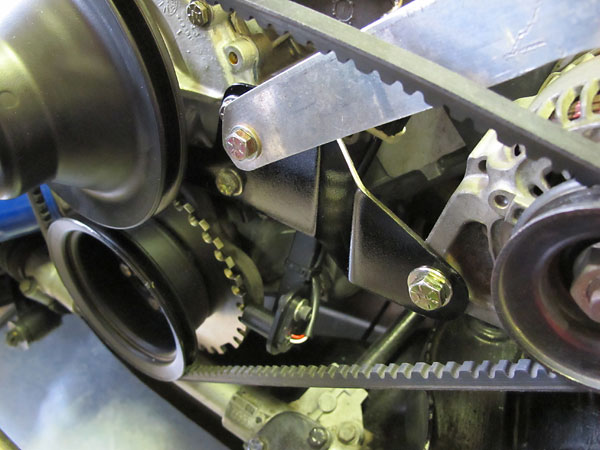
The trigger wheel shifted my crank pulley out of alignment, so I made a spacer for the
water pump pulley and a new outboard bracket (and spacer) for the alternator.
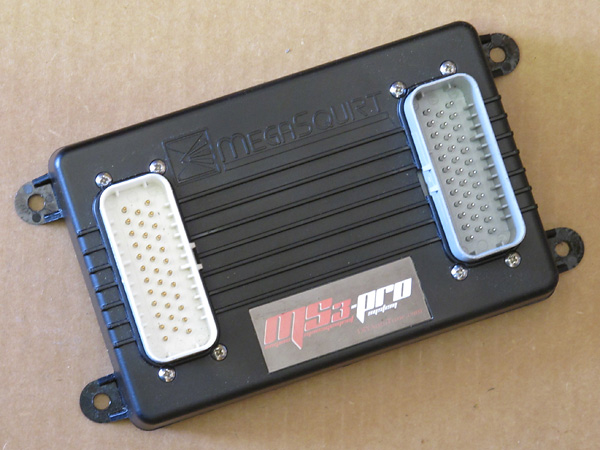
Here's a snapshot of the MS3-Pro engine computer. Initially, I only used it to control
electronic fuel injection. It's much more powerful than that! MS3-Pro computors will
support electronic ignition and they're handy for all sorts of data logging too.
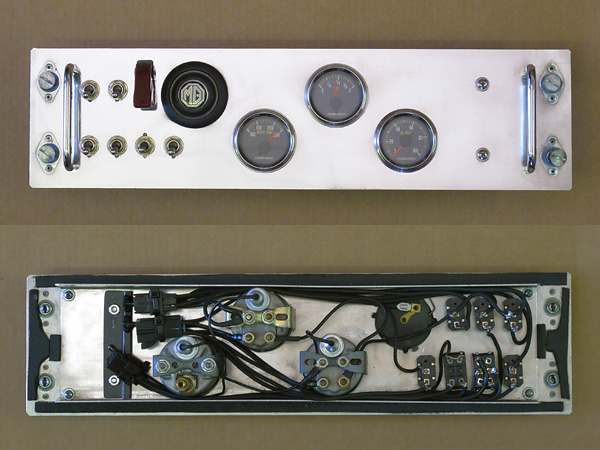
Although designed to be easily removable for service or upgrades, this instrument panel
served without modification from 1991 until 2013. Originally, a fuse panel was mounted
on the back side of the panel. As part of the EFI installation, I decided to add several
relays and make the long-overdue upgrade from glass fuses to blade fuses.
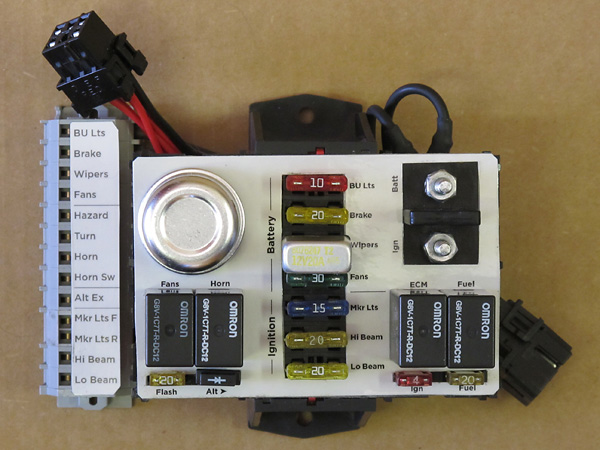
This new fuse and relay center will be mounted on the firewall next to the MS3-Pro ECM.
Incidentally, the two relays and two fuses at right are highly recommended features of
the MegaSquirt installation. Fuel pumps and injectors produce a lot of "noise" which
could potentially compromise the ability of the control module to "hear" various sensors.
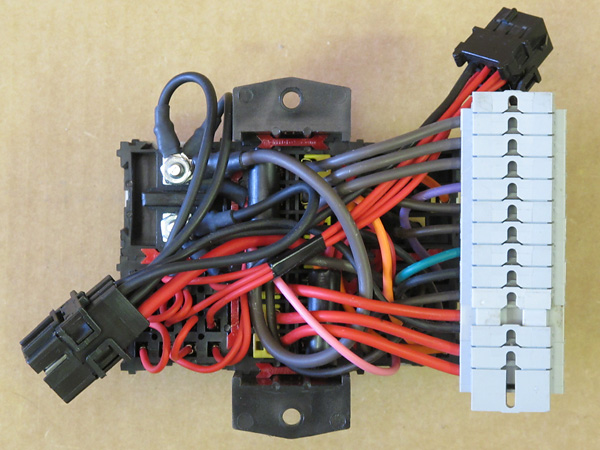
Part of this fuseblock was assembled by American Autowire (and marketed as a "Comp-9" kit).
I bought it at auction because I recognized they'd used DillBlox modular components. Thus,
it was easy for me to add a two-#10-power-stud block and also a two-relay-two-fuse block.
I also re-wired one of the previously existing relays to control my radiator cooling fans.
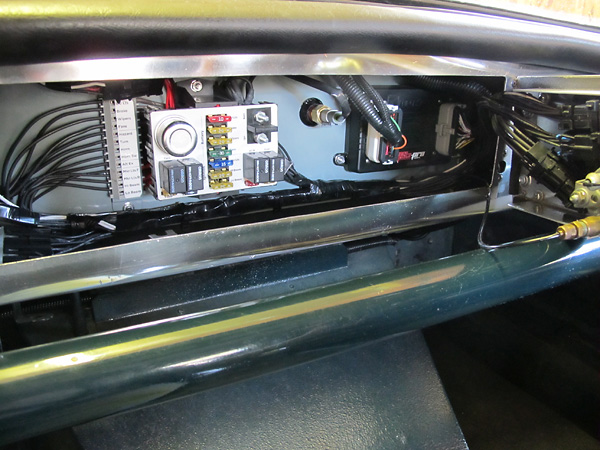
An intake air temperature (IAT) sensor is installed between the new fuse/relay center
and the MS3-Pro controller. Cables to the switch/gauge panel will pull out about eight
inches further. It attaches with three Metri-Pack connectors. The oil pressure gauge
is mechanical, and in this view you can see the hose that connects to it.
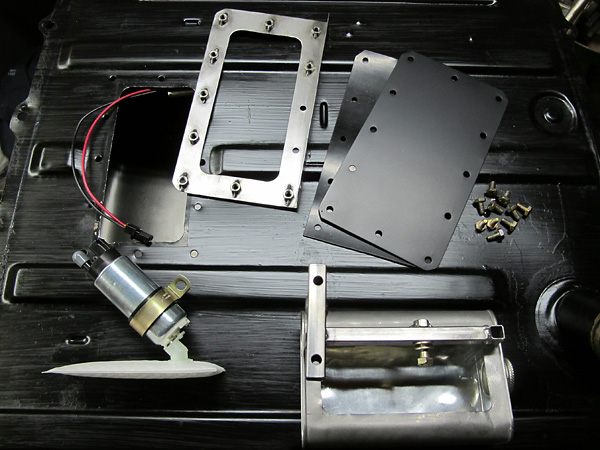
In-tank fuel pumps offer major advantages: fuel cools them and also muffles their noise.
However, a stock MGB fuel tank measures just six and half inches tall. I decided to
mount a Walbro GSS250 (190 liter per hour) fuel pump at a 45 degree angle.
A Honda Civic (1992-on) prefilter facilitated the installation.
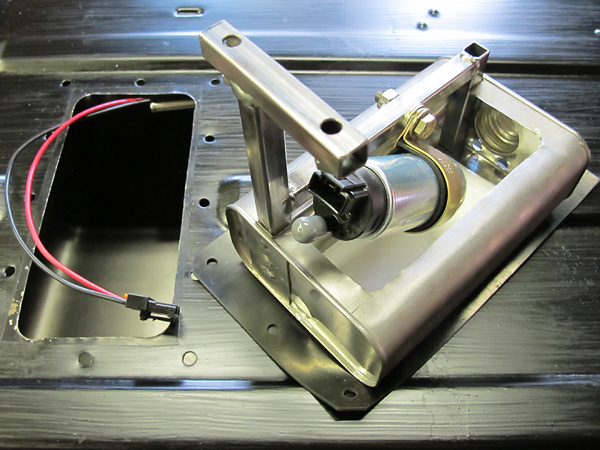
Fuel sloshing within the tank could easily cause the filter to come loose from the fuel pump,
so some sort of baffle is highly desirable. I fabricated a "false sump" type baffle from
materials in my recycling bin: an old solvent can and scraps of half inch box tubing.
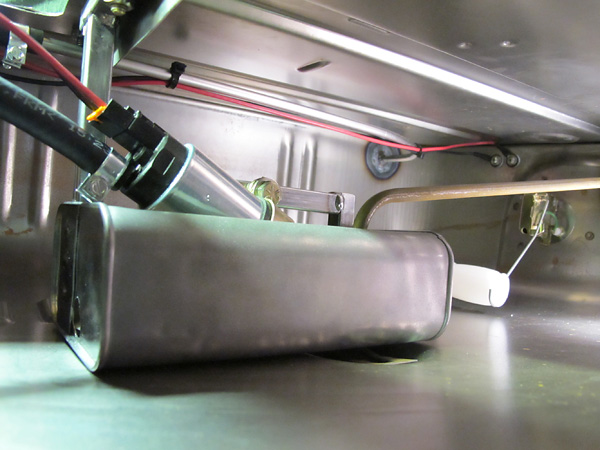
A new fuel outlet was fabricated from an AN-6 male weld-in fitting and a scrap of 5/16" stainless
steel tubing. Electrical passthrough connections were created by stacking PTFE washers of two
different outside diameters. The MGB's original fuel pickup remains in place, but will now
be used as a return line directly to the false sump.
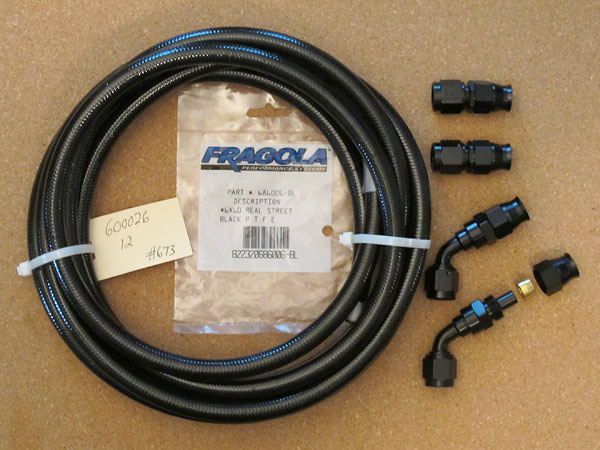
The higher pressure fuel supply line is PTFE (Teflon) lined with stainless steel braid
and a black outer sheathing so it's easy to keep clean plus less destructive to chassis
paint along its routing. Fragola straight AN-6 fittings are used at the fuel filter.
Fragola sixty-degree swivel fittings are used at the fuel rail and fuel tank.
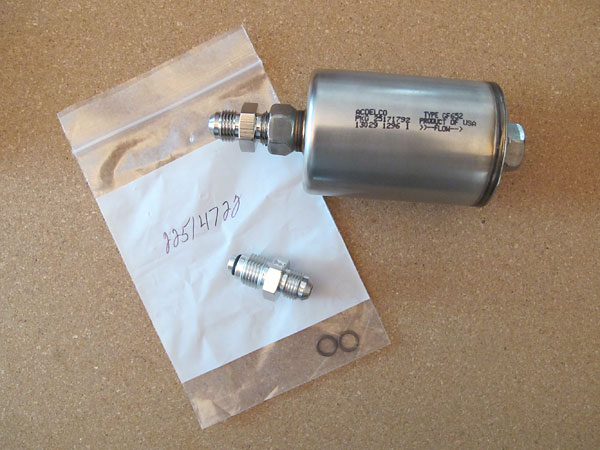
Install it and forget it: an AC Delco steel fuel filter will provide years of
trouble free service. AN-6 adapter fittings mate it to the new fuel lines.
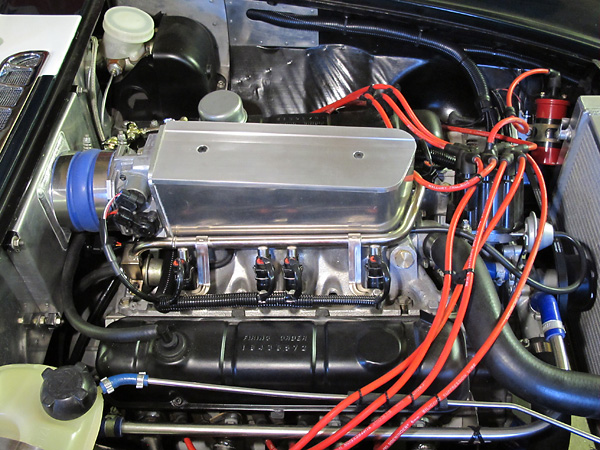
Fuel injector and sensor wiring is clipped to a formed and nickel plated steel rod
assembly, and then covered in nylon convoluted tubing of various sizes.
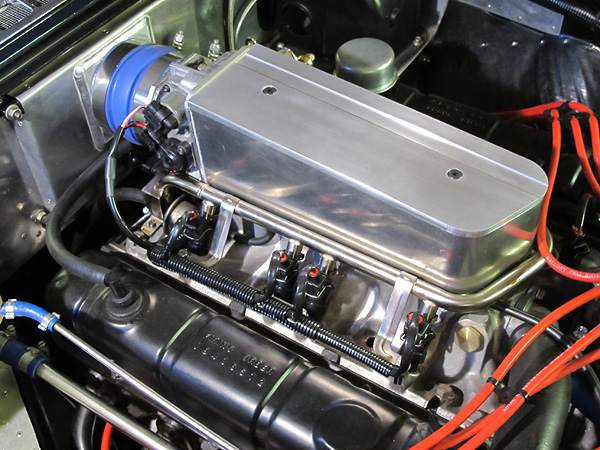
Throttle position sensor (TPS) and Idle Air Control (IAC) stepper motor valve
connections on the side of the throttle body assembly.
Please support the sponsoring companies who make British V8 possible, including:

Winter 2013/2014: Electronic Ignition
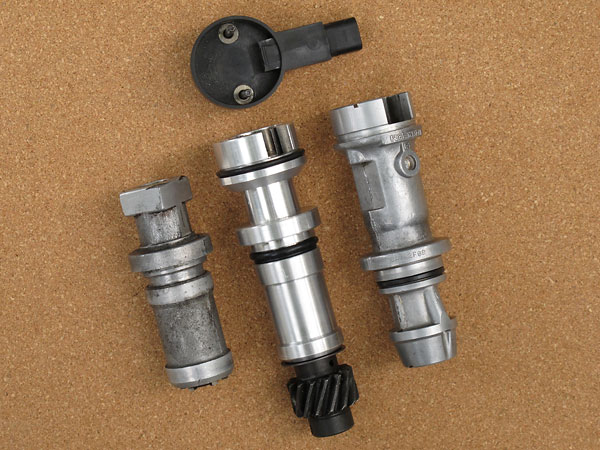
By this point the EFI system was running very well in batch-fire mode and I'd put a couple thousand
miles on it, but there was more to do. Addition of a cam position sensor would facilitate upgrading
to sequential injection and implementing electronic ignition. (Cam position sensors have a simple
job to do: differentiate exhaust strokes from compression strokes.) This photo shows an early 2000s
Ford Taurus/Windstar V6 cam position sensor (top and right) that I purchased and took apart. At left
is a section of old Buick 350 distributor. I copied its dimensions and used its drive gear for the
new custom part in the center. My good friend Scott McRoberts did the machine work.
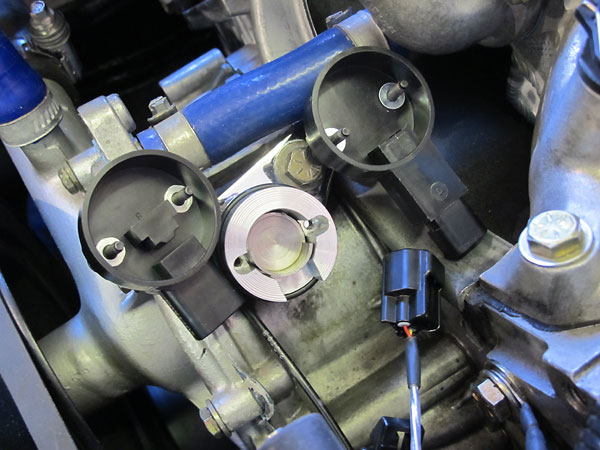
The Ford shaft was cut in diameter and length. We milled flats onto its end to drive a Buick oil
pump. Note how it has a "half moon wheel" at the top instead of one with one or more narrow
teeth. The sensor at right came with it; it's a VR (variable reluctance) 2-wire sensor. I prefer
to instead use the Hall effect 3-wire sensor at left. This particular Airtex Wells sensor (part#
5S1283) is an improved version of a Hall effect sensor Ford used in the 1990s. It features an
over-molded magnet instead of one that can shake loose. The functional advantage of a Hall
effect sensor in combination with a half moon wheel is quicker starts. MS3-Pro can "poll" cam
position when the crank sensor detects a missing tooth and immediately sync ignition timing.
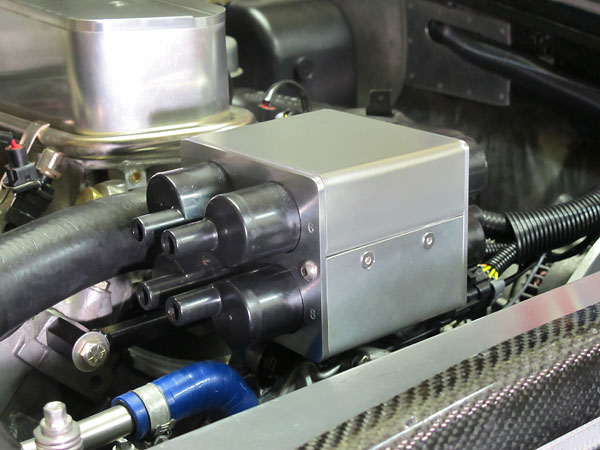
Here's the mount I invented to hold eight Chevy LS2 Truck ignition coils.
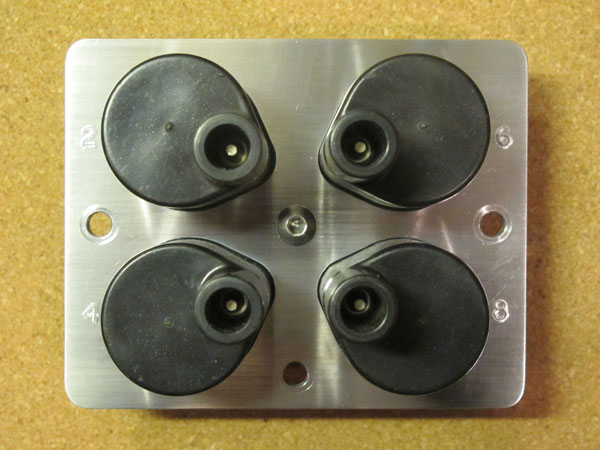
These coils are bad boys - possibly the most powerful coils ever installed by a major OEM.
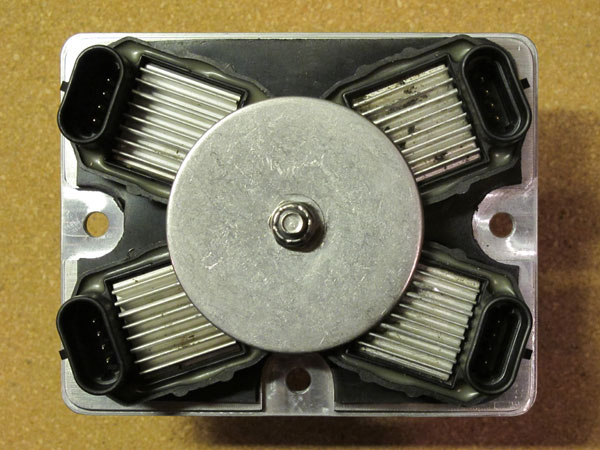
A neoprene gasket provides a modest measure of vibration isolation.
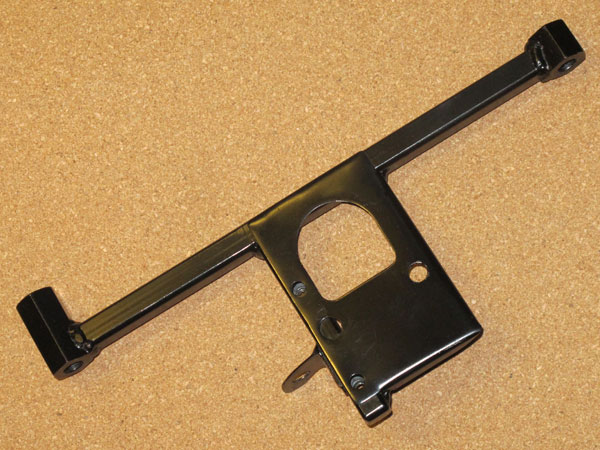
This bracket spans between the cylinder heads and a boss on the timing cover.
(The coil pack connects to it three places too.)
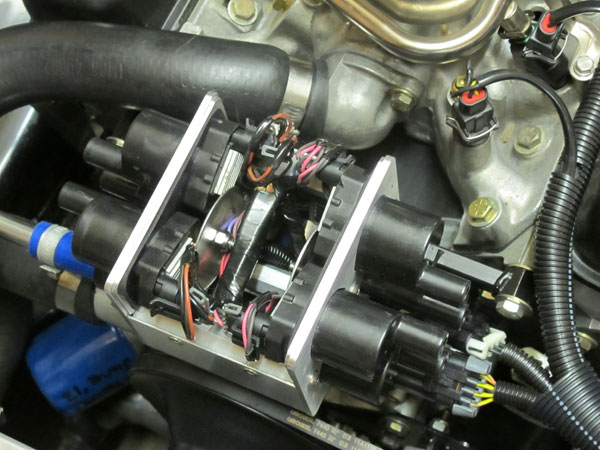
I reworked a pair of Chevrolet coil harnesses into one new harness. Now all eight
trigger leads come through one eight-way Metri-Pack connector, and a second three
way connector provides power and ground connections. (One ground is connected to
the engine. A second ground lead connects to the MegaSquirt MS3-Pro computer.)
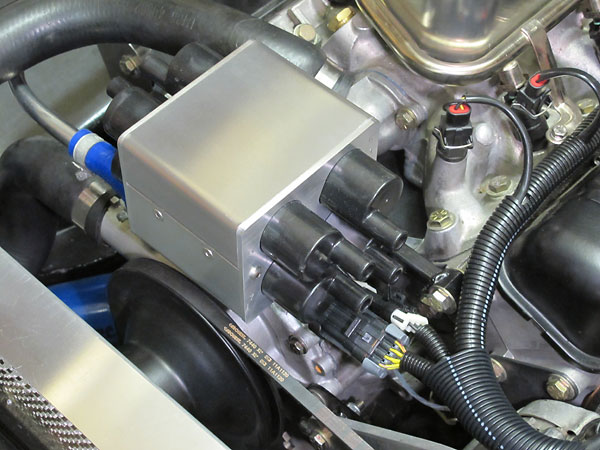
The top cover snaps back on neatly and tightly.
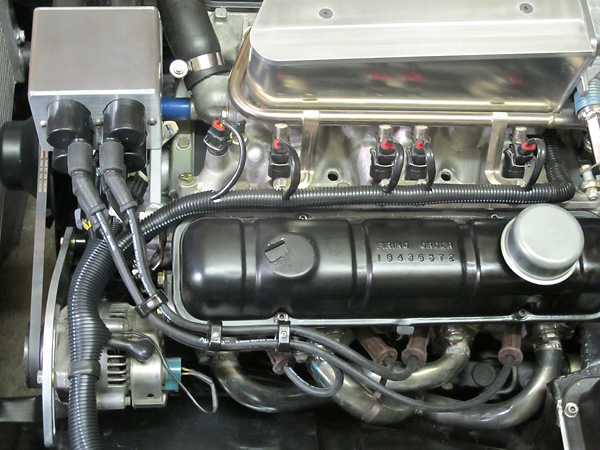
Aurora custom spark plug wires and Made-4-You Products "Smoothie Stac-Pak" separators.
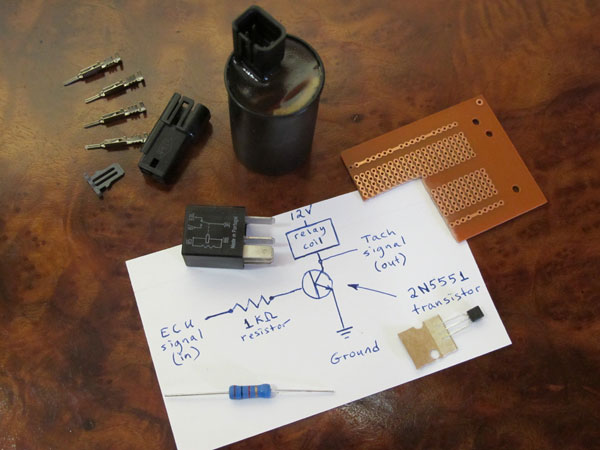
MS3-Pro will reportedly drive any modern tachometer. My tach wasn't modern, so I pieced
together an adapter from a gutted relay, a transistor, and a resistor. This photo shows
the finished part potted inside a 35mm film canister and some spare components. (The
adapter worked fine, but I upgraded to a new tach in 2016, making this redundant.)
October 2014: Refined Engine Tune
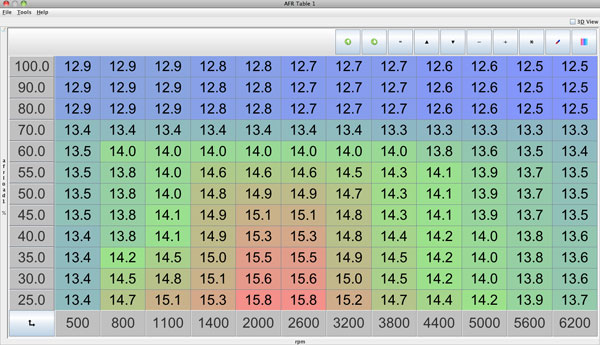
This is an "AFR Table" for my Buick/Rover V8 engine. Obviously the x-axis is engine speed.
The table's y-axis is "Fuel Load %", which is derived from the MAP sensor's measurements.
The table's cells (i.e. the z-axis) show the target air/fuel ratios I had as of 2014. (Note: as
of 2016, my tune has been updated to "stoich" (14.7:1) at idle speeds and it's also leaner
in the cruise region. Result: a smoother/slower idle and better fuel economy.)
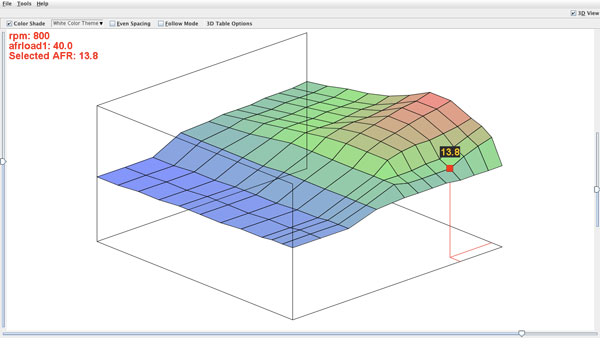
This is the exact same AFR Table, except converted into a "topographic map" view.
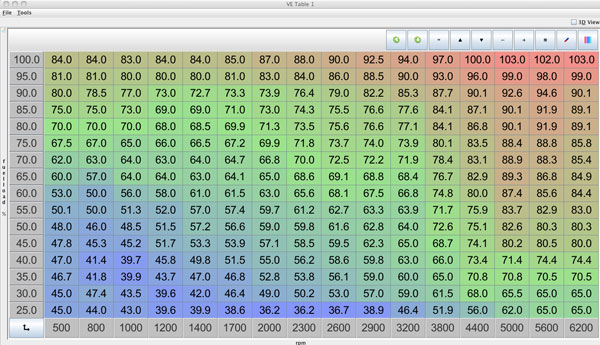
This is a Volumetric Efficiency table, tuned for the characteristics of my engine
including for example its fuel injection system, camshaft grind, cylinder heads, etc.
The VE table is really critical for engine operation because its z-axis is the main
determinant for how long fuel injectors are pulsed for each combustion event.
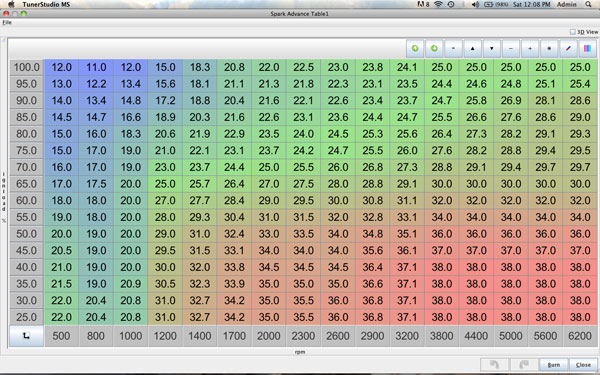
If you're familiar with mechanical and vacuum advance mechanisms on distributors,
you'll have no trouble comprehending this table: x equals engine speed, y equals
manifold vacuum, and the z axis shows ignition advance (in degrees before TDC).
April 2013: Wilwood Dynalite Brake Calipers and 11.75" Vented Rotors
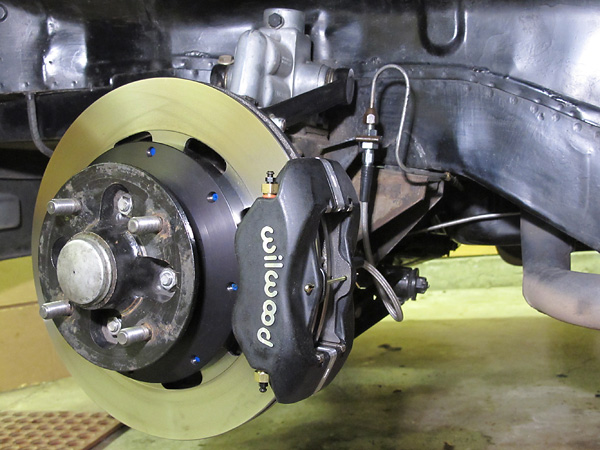
Wilwood Dynalite four-pot forged aluminum brake calipers and 11.75" vented rotors,
sourced from Bill Guzman at Classic Conversions Engineering.
May 2012: Coilover Front Suspension with Dropped Spindles
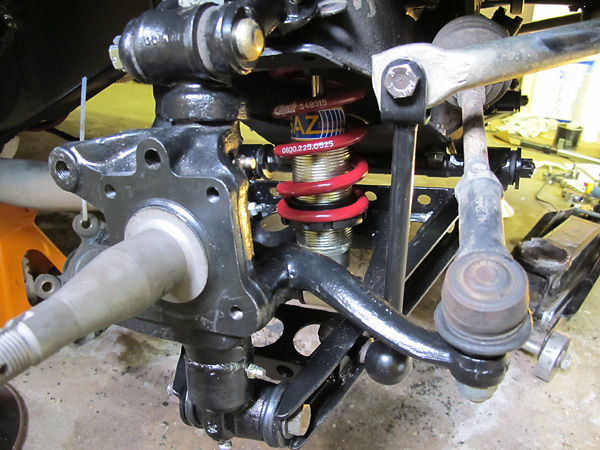
Gutted and milled out Armstrong lever shock absorbers have been combined with GAZ single
adjustable coilover shock absorbers from Moss Europe and Eibach 525 pound/inch springs.
Lower spring pans from Moss Motors have been drilled out to reduce their weight. Dropped
spindles sourced from Targett Motorsports lower the car one inch, and do so without
shifting the suspension's roll center lower. Most importantly of all, the steering arms
have been modified to minimize bump steer associated with the lowered ride height.
April 2012: My First Home-Made Carbon Fiber Part
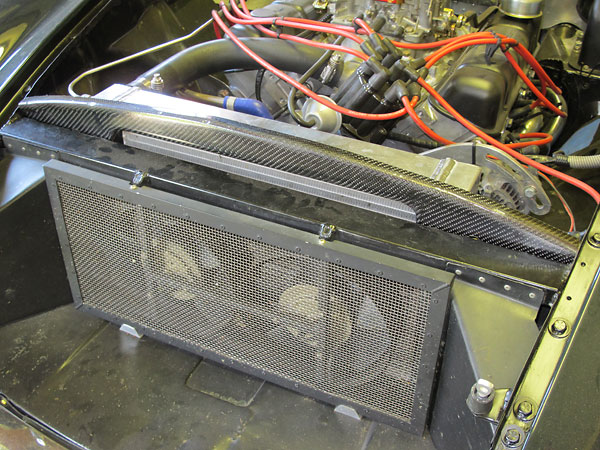
This custom carbon fiber and epoxy recirc shield touches the bottom of the bonnet all
the way across, preventing any airflow from bypassing the radiator. This part only
weighes about five ounces! It'd be even lighter if I had tools for vacuum bagging.
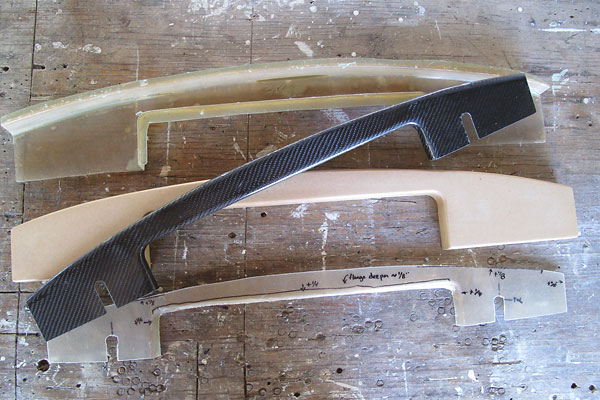
Foreground: the new carbon part, freshly removed from the mold (and trimmed on a bandsaw.)
Background, bottom to top: a quick-and-dirty fiberglass/polyester prototype, an MDF "plug",
and the fiberglass mold made by draping over the plug. Obviously I could have made the
recirc shield out of aluminum or whatever, but learning new fabrication techniques is fun.
Please support the sponsoring companies who make British V8 possible, including:

Winter 2011: Custom Carbon Fiber Bonnet
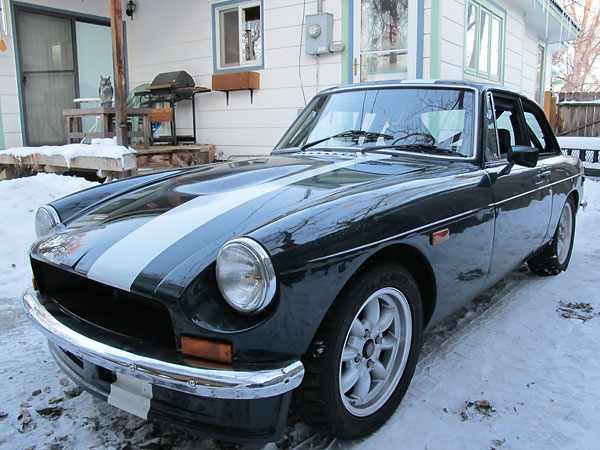
In 2011, my good friend Dave Craddock of Preform Resources built this custom carbon fiber bonnet.
The new bonnet weighs less than five pounds! That's over twenty pounds less than a steel one.
I reckon Bonnie probably has the lightest weight bonnet of any MGB in the entire world.
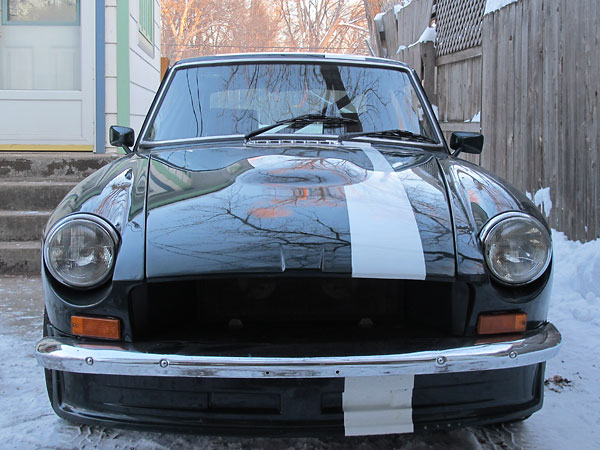
These photos were snapped just hours after I received it. Hood pins have subsequently been installed
to hold down the front. Hidden aluminum tabs hold down the back; they slide into slots cut into the
MG's steel bodyshell above the original hinge positions.
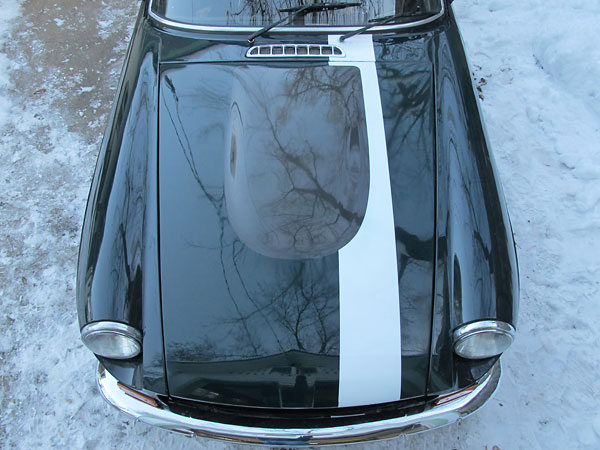
The large "RV8 style" bulge in the bonnet provides room for a new induction system (see below).
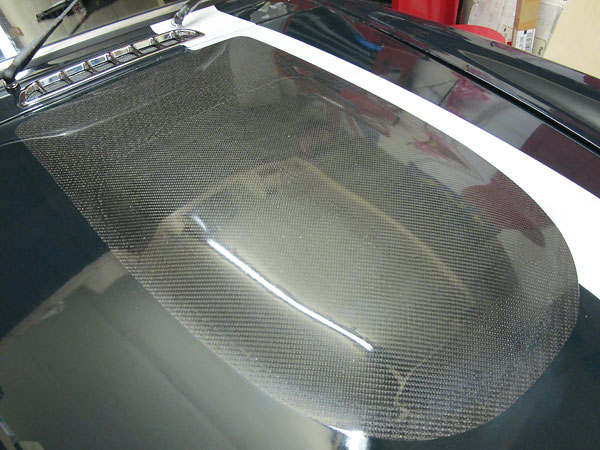
"When you got it, flaunt it!" - It would be a pity not to show off a little of the carbon fabric.
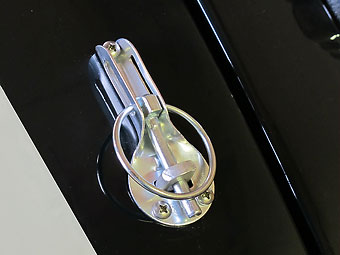
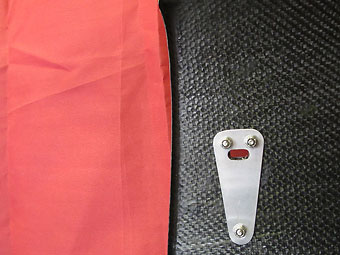 Instead of regular glued-on reinforcements with provisions for hinges and latches, this hood
"skin" has only a honeycomb core to provide its stiffness. To avoid crushing the core when
installing OMP aluminum hood pins (part# EB/492/A), I crafted aluminum reinforcements.
Somebody Asked For Close-up Photos of my Oil Filter Installation
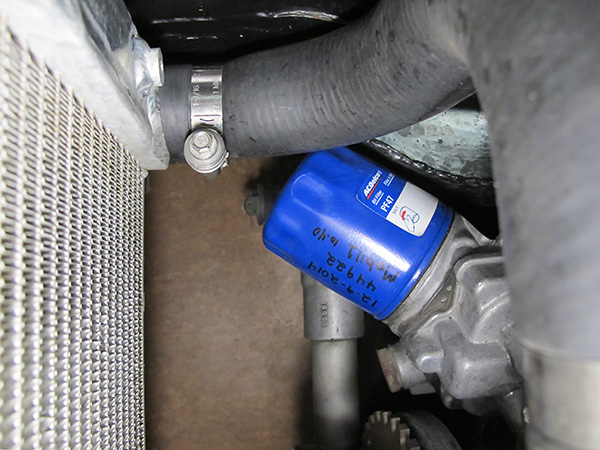
A Buick V6 "metric" oil pump facilitated doing away with the previous remote oil filter.
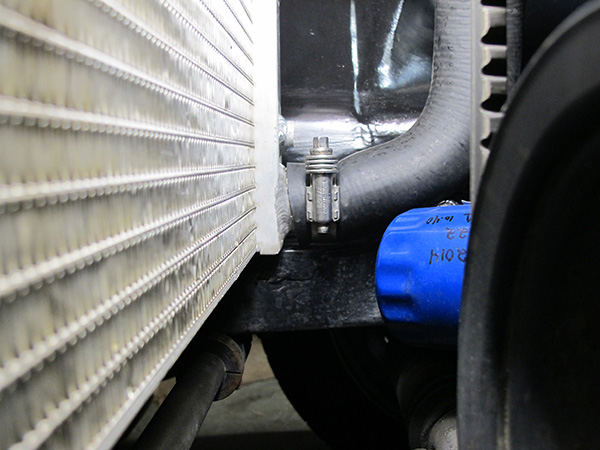
I formed a shallow recess with a few blows of a ballpeen hammer.
AC Delco PF47 (and similar) oil filters fit nicely.
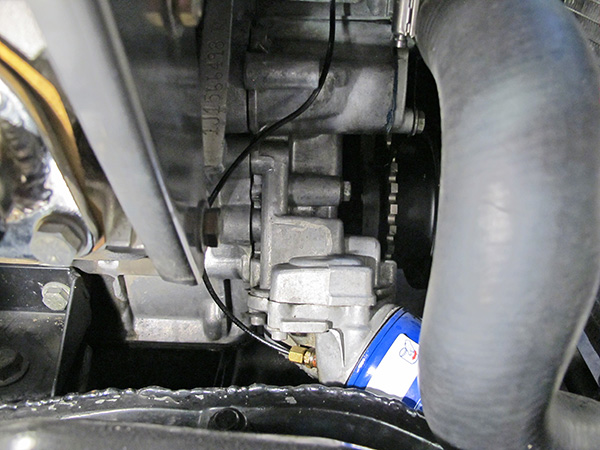
Vinyl hose and compression fitting for the oil pressure gauge.
Click Here to see Photos from Bonnie's 2014 North American Tour!
Original How-It-Was-Done Text
(exactly as published in MG V-8 Newsletter, Volume 5 Issue 1, February 1997.)
By: Curtis Jacobson
City: Greensboro NC
Model: MGB/GT (purchased for $1.00 in 1987)
Year: 1971
Color: British Racing Green with white Sebring stripe
| Engine: | 1963 Buick Special 215. (Complete running car purchased for $150!) Bored 0.030" oversize, Kenne-Bell cam, Edelbrock carburetor, Mallory Unilite distributor, oil pump kit (longer gears), remote oil filter (home-made adapter). |
| Transmission: | 1992-model Borg Warner T5 5-speed manual. Transmission was purchased new (Rockland Standard Gear, $995). Transmission is the Camaro style with GM mounting configuration and 1-1/8" 26-spline input, friction-lined rings (instead of brass synchros) and integral shifter linkage. |
| Bellhousing: | 1963? Buick, purchased loose with T10 transmission. |
| Clutch Slave Cylinder: | Girling 0.87" bore. Cylinder mounting bracket and link with spherical rod end were specially fabricated. |
| Clutch: | 1992 Mercedes 190SL. Purchased new, no modifications required. Outside plate diameter is less than 9-1/2" so you can use it with the stock Buick pressure plate and with unmodified Borg Warner T5 trans. |
| Flywheel: | Stock 1963 Buick. |
| Exhaust: | Home-made sand bent Tri-Y's. (These are really pretty!) Dual side exhaust with mufflers pocketed up under seats. |
| Brakes: |
Cross drilled front rotors. Ford 9" drums brakes, redrilled for MGB lug pattern.
Currently making plans for dual master cylinders and rear disc brakes. Rear disc
brakes will be tricky due to limited clearance between springs and parking brake
mechanism, otherwise aftermarket Mustang parts will bolt on.
|
| Wheels/Tires: | Goodyear Eagle GTII tires (P195/60 R14) on 8-spoke Minilite copies (14"x5.5", 13.6# ea) |
| Suspension: | Moss coil-over front suspension kit (highly recommended). Moss telescoping rear shocks (required substantial rework). (So did mine! - Ed.) Kingpins, steering, leafs springs, etc. renewed. |
| Cooling System: | MGB radiator re-ported but not inverted. Filler neck removed. Plastic remote surge/fill tank fitted on firewall with a direct line to the water pump to prevent cavitation. New structure and ductwork around radiator fabricated for improved rigidity and airflow. (I didn't cut into the box section structure ahead of the radiator.) Twin 8-1/4" fans (from Honda Civic A/C system) ahead of the radiator. Low clearance fan rings fitted to increase efficiency. |
| Rear End: | 1992 Ford Mustang 5.0 8.8" Traction-Lok limited-slip differential with 3.27:1 gearing. Purchased at salvage yard for $500, and subsquently narrowed. (See REAR ENDS article in this issue for additional information.) |
| Instruments: |
Fuel level - Smith's (incredibly inaccurate), Oil pressure - Stewart Warner (mechanical) Water temp - Stewart Warner (electric) Speedometer - VDO (electronic/programmable) Tachometer - Sun. |
| Other Modifications: |
Nippondenso integral regulator alternator on fabricated mounting (very light.) 6-point roll cage (aids handling due to vastly improved rigidity.) Cowl induction/panel air filter. Home made steering column, aluminum dashboard, and interior trim panels. Modern wiring harness featuring sealed Metri-Pack connectors. |
| General Recommendations: |
Chrome bumper MG's handle and look better than rubber bumper MG's because they sit lower
and because they sit at the ride height the designer intended. The lower height substantially
reduces space available for fitting a V8, especially without modifying the front crossmember
or steering shaft, but the conversion is especially rewarding at the end. An important
advantage of starting with an older car is that it's easier to keep them legally on the road
in states that require you to keep the stock level of emission control. (In my state, with
a post-1975 MGB you'd have to fit catalytic converters to pass annual inspection. Check with
your state.) Buick parts cost much less than Rover parts and are much easier to find locally. In my opinion, the ONLY reason British cars don't have as good a reputation for reliability as some other imports is the quality of Lucas electrical parts. If someone is willing to accept the challenge of installing a V8 in an MG, they shouldn't be intimidated by rewiring the car with better quality wire, components, and technique. Switches and light fixtures are also very easy to upgrade. Why wait until they leave you stranded? For example, Volkswagen Jetta front turn signals fit a chrome bumper MGB with only a little modification. Many Japanese cars from the 1980s were fitted with side marker and license plate lamps than can easily be installed on an MGB. They look less clunky than the original, and they work really well. You can streamline appearance, save an amazing amount of money, stop opening up light fixtures to clean corroded contacts, and you'll be safer because of vastly superior modern optics. |
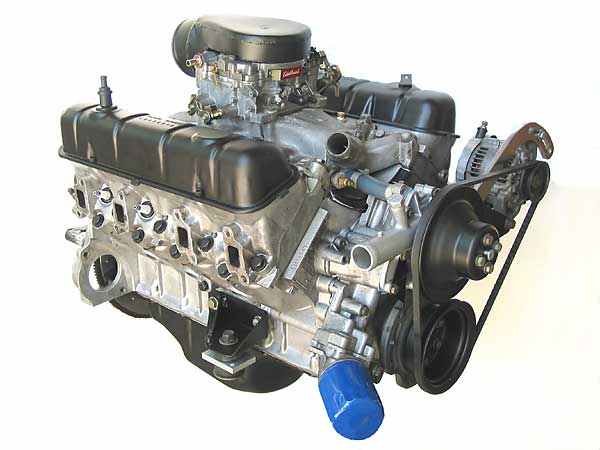
One of the custom motor mounts. Buick V6 "metric" oil pump, which angles the filter forward.
Note: Pete at Mantell Motorsport blasted & powder-coated all the black parts shown here.
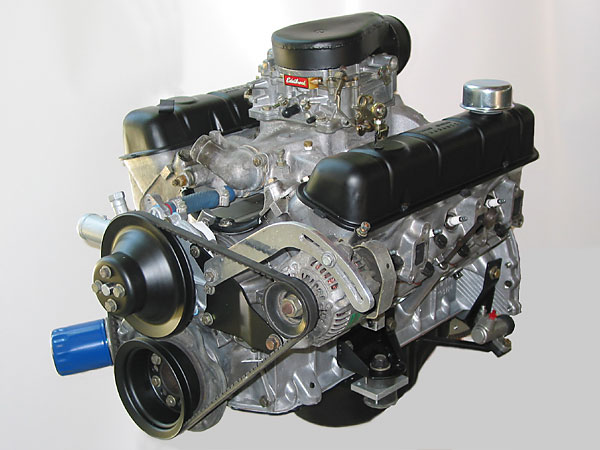
A compact Nippondenso alternator and an external clutch slave cylinder, both on custom brackets.
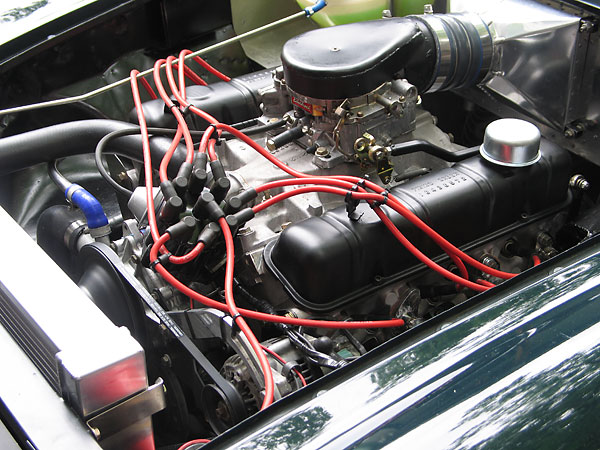
The seven accessory mounting bosses on Rover 4.0L heads are placed differently than the two bosses
on original Buick 215 heads. Upgrading heads necessitated significant alternator bracket modifications.
Also, two bosses had to be cut off to clear the driver side bulkhead. A more surprising difference:
exhaust port spacing is slightly different between Buick and Rover heads. Just different enough
that I had to enlarge the mounting holes in my precision-crafted headers!
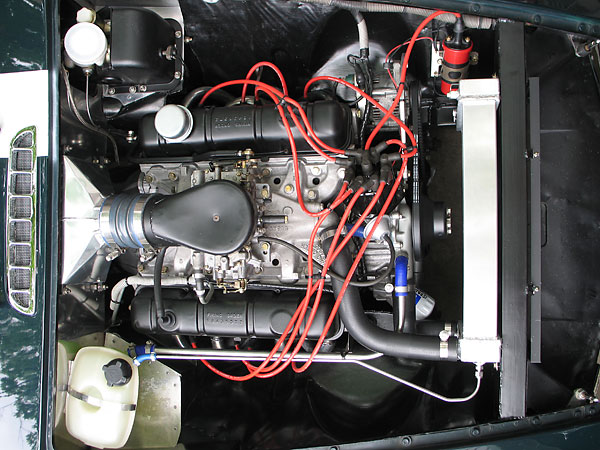
The radiator is directly above the anti-sway bar, not out in front.
The Buick V8 engine is mounted further rearward than usual too.
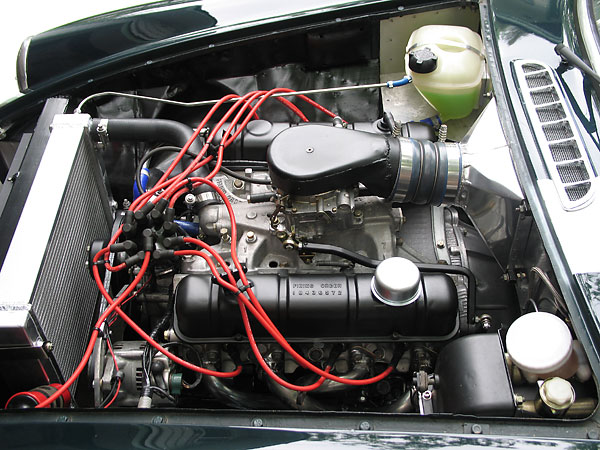
Cold air induction is one unusual feature of this Buick "215" engine installation.
A throttle linkage is employed, in lieu of a cable.
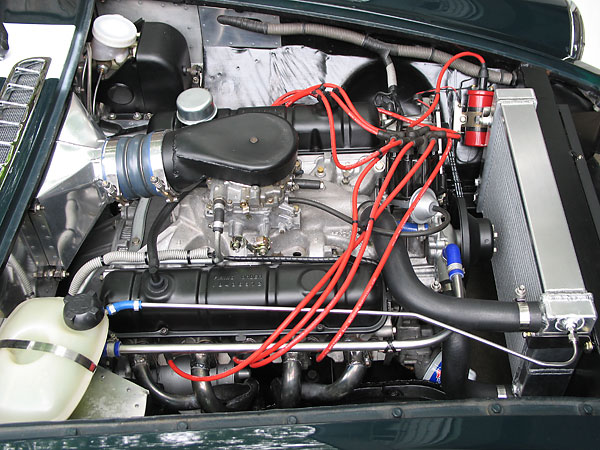
Stainless steel vent lines ensure self-purging of air from the cooling system.
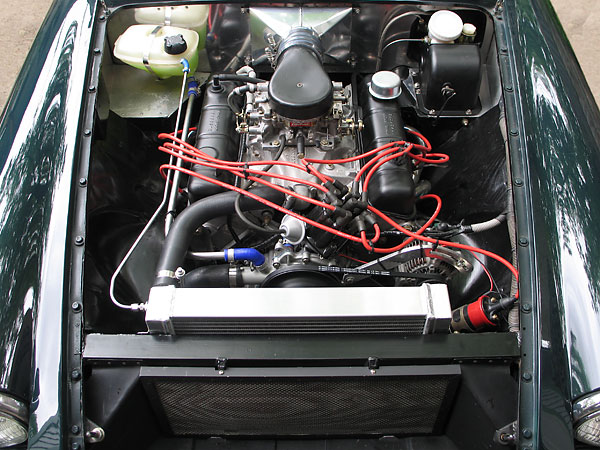
AFCO "Scirocco" dual-pass aluminum racing radiator (part number 80107N).
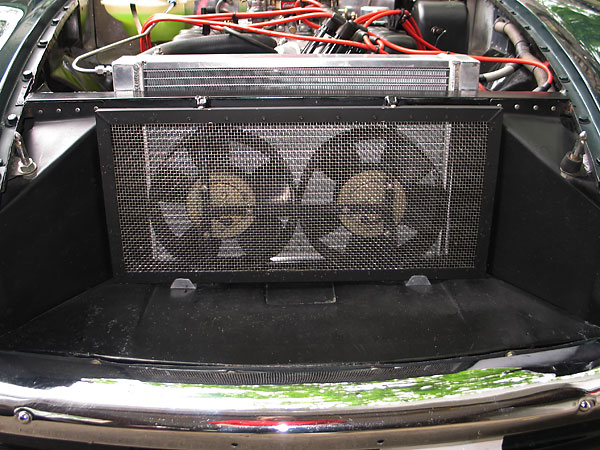
Twin Honda Civic electric cooling fans.
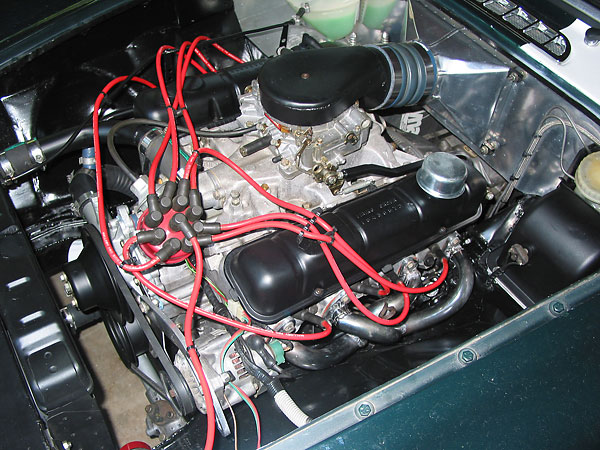
Homemade sand-bent Tri-Y headers with slip joints at the collectors for easy installation. The
theory of this design is that proper pairing can improve exhaust scavenging. For the Buick's
firing sequence, cylinders are paired as follows: 1 & 5, 3 & 7, 2 & 4, and 6 & 8.
(Note the modified MGB radiator, which was used for about seventeen years.)
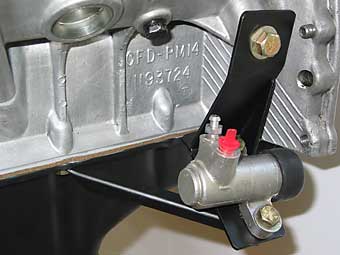
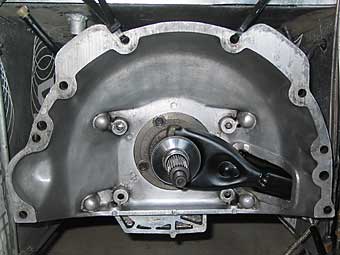
Custom mount for a Girling slave cylinder, and shortened throw-out fork.
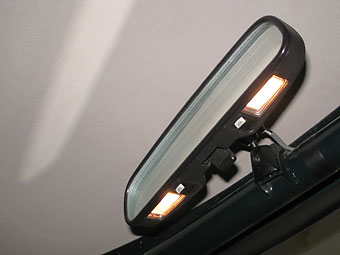
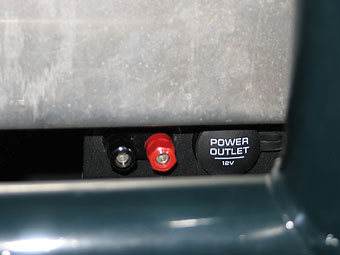 Left: Chevy S10 rear view mirror with integral map lights. Right: 12V power socket & binder posts.
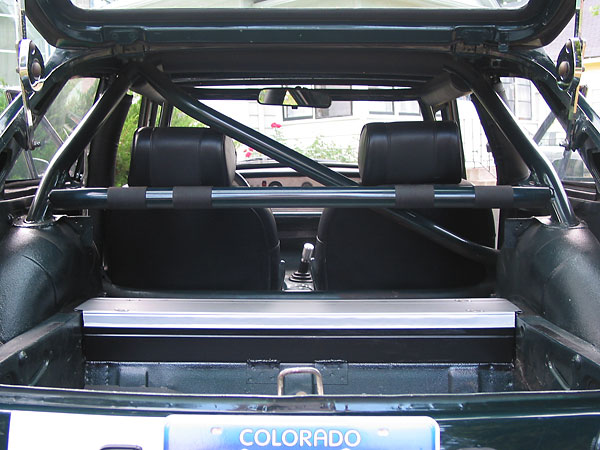
Six-point roll cage made from 1.75" seamless (DOM) mild steel tubing, w/ 0.090" wall thickness.
Note horizontal tubes under the dashboard, at shoulder-strap height, and low, behind the seats.
This photo also shows the built-in tool chest, with lid held down by Dzus quarter-turn fasteners.
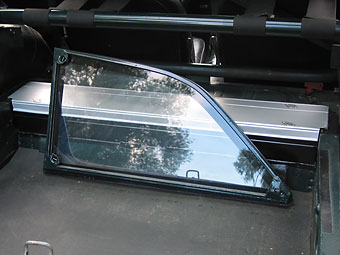
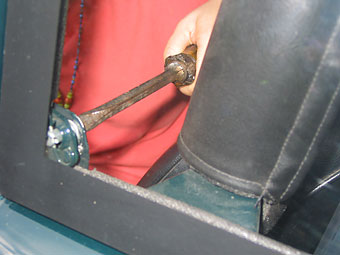 Lightweight polycarbonate quarter windows are secured in place with Dzus quarter-turn
fasteners (three per window), and they're easily removable for ventilation.
Righthand photo also shows one of many supplemental cage-to-body brackets.
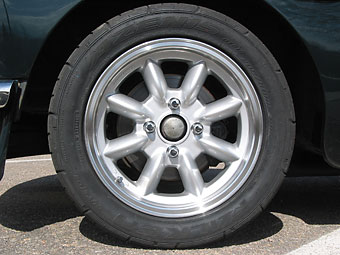
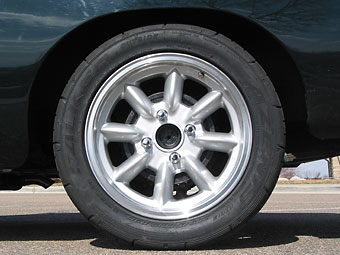
Panasport 15x6 -22mm wheels weigh 15.0# each. 205/50-R15 tires.
Notice: all the articles and almost all the photos on BritishRacecar.com are by Curtis Jacobson.
(Photos that aren't by Curtis are explicitly credited.) Reproduction without prior written permission is prohibited.
Contact us to purchase images or reproduction permission. Higher resolution images are optionally available.
